The mittens are done! All that remains is to wrap them, and take them to the gym and gift them.
I am really looking forward to giving these away. But until then, I've been enjoying showing them to anyone that would look! This is the first project I have done that I have planned every step of the way, starting with the fleece and working through to the knit object.
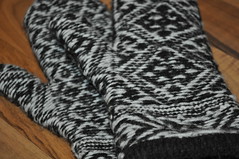
The pattern is
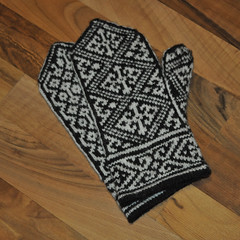
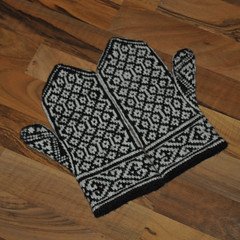
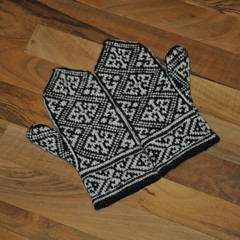
Egyptian Mittens by Tuulia Salmela. It is not in English, but Google Translate does a decent job with it. Luckily, I didn't really need to bother with the translation since the pattern is charted. Follow the chart, and everything is okay.
I added my own twist on things in general.
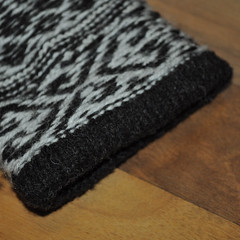
I used a crochet provisional cast-on. I had planned on knitting a long cuff back up inside the mitts when I was done, but they fit well enough that I decided a short turn was better. The provisional cast on gave me the freedom to decide on the fly how long to make that turned cuff.
I rotated the pattern on the cuff so that the two mittens matched, rather than the wrist pattern on one showing on the back of the second.
I stopped the thumb early. I did knit the thumb as written, but it came out freakishly long and pointy. That's well enough, but I don't like all that fabric flopping around in the way.
I changed the motif in the pattern. I dumped the star, and turned the other motif 90-degrees. This eliminated most of the very-long floats. I dropped a couple of white stitches in a few places to take care of the rest. The motif still looks lovely, but since there are no floats longer than five stitches, I did not have to capture any that might show through on the front of the knitting, and I still don't have any long enough to snare a finger as you put the mitten on.
I didn't plan on blocking them, but figured that could be a good thing. Let me assure you, blocking
is an amazing thing. I cut forms out of a cardboard box and covered them with plastic bags to insert in the mittens as they dried after washing. It gave them a really professionally finished appearance.
All of these things combine to make a mitten of which I am quite proud.

No comments:
Post a Comment