Monday, February 16, 2009

Mardi Gras Rose


Mardi Gras Rose
Originally uploaded by Project Pictures
I love when inspiration strikes just the right note, and you can actually follow through on an idea.

I've been stumped for two weeks on this month's Spindler's group challenge. The theme is "Mardi Gras", and quite honestly, I've never been to one. I'm not really thrilled with the traditional combination of purple, green and gold, either. I couldn't manage to piece them together from my meagre stash of fiber, nor did I feel like making any sort of novelty yarn with lame, sparkle or beads.

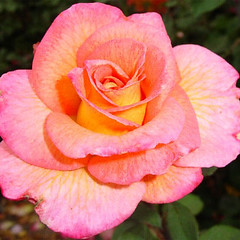
So I went to Google and searched their image database, giving it "Mardi Gras" to go on. Of course the majority of images that came back were pictures in green, purple and gold, along with beads, feathers, masks, and masqueraders. But amongst all that, one popped out to the front, grabbing my attention. I clicked through to the page and read up on the Mardi Gras Rose.

Now, this I could work with!


Mardi Gras Rose Fiber
I happily went stash diving. I have a nice variety of tiny bits of random rovings that I picked up on a lark. It was called a "Cupcake Bag" on Etsy, and is someone else's leftovers from other projects. I'm not entirely sure HOW you end up with leftovers, but I'm perfectly happy to practice on them! I culled out what would work for me, and arranged them artfully to reflect my inspiration.

Then I developed my plan for spinning.

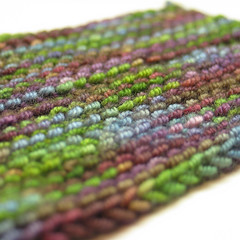
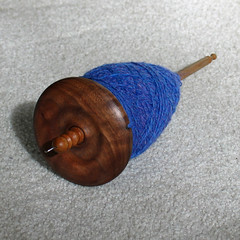
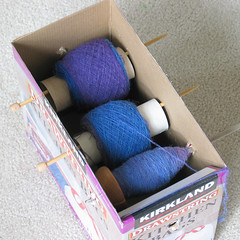
I decided I wanted a soft, fluffy yarn from this batch, and I wanted to preserve a specific color sequence, but I didn’t want to chain ply it. I split out each color that I wanted in the roving, and came up a little short in weight, so added a little blue to the beginning to bring me up to one full ounce of roving. I then split each section into thirds (I love my gram scale) and spun them up in sequence.

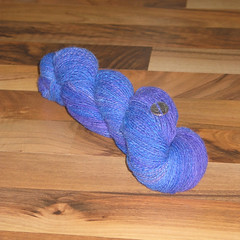
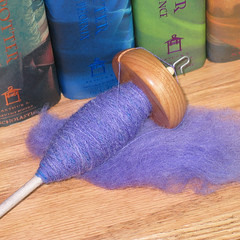
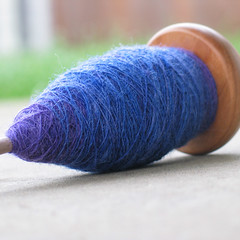
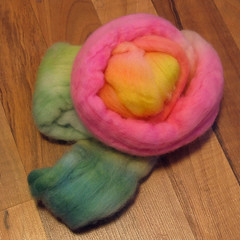
In the end I had a color sequence that went: blue/green for the dark stem and foliage, bright pink, orange pink, yellow, orange pink, and bright pink. I knew I wouldn’t spin each section exactly the same, but I wanted some blending between each color so I was pleased with the prospect of the singles not matching exactly. I also decided that because I already felt very confident with a worsted draw from the end of the roving, that instead I would practice a woolen draw from the fold of each section, trying to spin the singles evenly.

Mardi Gras Rose yarn
Here's the final result. It is approximately 45 yards in 30 grams, woolen spun, 3 ply. It is also deliciously squishy and soft!

Friday, February 13, 2009

Handsome Devil


Grey Gansey
Originally uploaded by Project Pictures
My daughter originally modeled this sweater for me, making sure that it was going to fit the intended recipient. He's a year younger than she is, but that just made it all the more certain that he woulud be able to use the sweater this year, and hopefully next year as well.

The pattern is inspired by a DROPS design, but I ended up tossing out the pattern (as I often do). Instead, I took a size 4T sweatshirt and kept it in my knitting bag. Every ten rows or so, I compared the two, altered my knitting plan where necessary, and continued on. It yielded a very comfortable and lovely grey sweater with drop sleeves and double-moss-stitch patterning. Quite classy. So is the young man wearing it!

Thursday, February 12, 2009

February Lady Sweater Swatch


FLS Swatch
Originally uploaded by Project Pictures
In between large amounts of spinning, I sat down and attempted to swatch for my February Lady Sweater.

Technically I am running a KAL that started on February 1st. I had intended to knit the entire sweater in the month of February. That is, before my marathon knitting to finish the Celtic Cardigan left my fingers exhausted, hands rubbery and arms sore. Ah, well. Even the best plans don't always work out.

Part way through the swatch I started to feel a bit rubbery again, but I pushed through to the end so that I could wash it and at least have my gauge. Half the swatch is knit on the suggested size-8 needles, and the other half is on size-9s. The 9s hit gauge spot-on, both before and after washing, so provided I don't start knitting even tighter as my hands heal up, that's what I'll be using.

The yarn is Blue Moon Fiber Arts' Socks that Rock, Heavyweight. It's billed as sock yarn, but listed on their site as worsted, rather than fingering. In garter stitch it knits up as a super-smooshy fabric with lots of bounce. I adore this colorway and think it is going to be an absolutely fantastic February Lady Sweater.

Little Yarn Angel


Little Yarn Angel
Originally uploaded by Project Pictures
I had to wait for the morning light to capture the full glory of my finished skein. My daughter insisted on sharing the moment, showing off my yarn to the overcast sky to get a true-light shot, or at least as true as we can get it in a Pacific Northwest Winter. I wanted to get a few more pictures posted of the finishing process, now that I have them.

Washing yarn
For instance there is the wonderful fact that with a PVC niddy noddy, you don't even need to take off your skein to wash it! With as much twist as I have in this skein, it was good to get a long, warm bath to set everything in place. After that I enjoyed beating it on the ground to shake things up. I must thank the fact that I have a sweater-rack in my dryer to satisfy my need to have the skein done and dry RIGHT NOW!!

And what would we do without one shot of the final product?!
400 yards fingering

Idiocy Strikes

My first attempt at making a PVC niddy noddy (with 18" center) created a skein that was too long for my swift. At its fullest extension, the swift holds 70", just short of two yards. When winding out to the very ends of the arms of my niddy noddy, I was getting a significantly longer skein than a mere two yards. In my mind, 1.5 yards ought to be just the right size, and great for recalculating yardage later (since 1.5 * wraps is easy).

Because I was winding along the ends of my niddy noddy, rather than right next to the cross-piece, I was making a long diagonal length from end to end. Feeling smart, I got out my pen and paper and applied a little basic trigonometry to the problem and arrived at what I thought was a proper length for the center bar. Intuitively, it seemed awfully short. However, I'm rarely one to trust a gut feeling over a properly calculated answer so I sat hard on that little part of my brain saying, "Hey, there.. not right! Not right!". Hack-saw in hand, I obtained a properly short piece of PVC. When done, I measured the skein and that half-squished part of my brain piped up again. "Hey! That's too short for a 1.5 yard skein! Too short! You did the math wrong!"

So I futzed with the niddy noddy, holding it in odd contortions and trying to wrap yarn around it while wishing for a third hand, and estimated without math. This added 2 inches to the center bar and produced a longer skein that matched what I thought it should be.

The problem is that my BASIC MATH SKILLS failed me here. Oh, no. Not the Trig. THAT, I did right. For some reason, when I checked the skein length the first try my traitor brain said, "54 inches? No WAY that 54 inches is 1.5 yards..." Um, Brain? Heh-LLO! 54 inches is exactly 1.5 yards! When I extended the center-bar, I ended up with a 66" skein. I don't know why my abused, sleep-deprived brain settled on this as the CORRECT amount for a yard-and-one-half. But there it is. A 66" skein.

Not all is lost! I still have the shorter center-bar so I can make a 1.5 yard skein. In addition, the skein I wound off last night is not the 345 yards I believed I had, but rather a full 400 yards (I checked, twice)! The yarn is a little rough to touch even after washing, conditioning and thwacking thoroughly. And while it's not dreamy in your hands like merino, the color is so amazingly beautiful that I'm not sure I can relegate it to my feet in the form of socks. I'm debating a triangular scarf/shawl of some sort I could tuck on the outside of my black wool pea-coat for decoration. It would be gorgeous!

Wednesday, February 11, 2009

One heavy spindle!

Let me tell you, I'm very seriously considering finding some other project for this yarn.. because it seems a right shame to have gone through the trouble to ply the whole 100 grams, only to cut it in half for socks!!

This thing got heavy. The cop got seriously huge. I had to tinker with all sorts of different ways to wind it on to keep it stable. I ended up alternating between winding it cross-ways for one layer, and winding straight around to even it out. The yarn is beautiful so far and very even as far as I can tell. I can't wait to get it wound into a skein.

PVC Niddy Noddy
Some days I am really thankful that I'm not afraid of tools. I don't mind pulling out a power drill or hacksaw and going to town. I put together a PVC niddy-noddy just for winding this yarn. To make one, you start with about 4 feet of PVC pipe (I used 1" diameter pipe), and two T-connectors. Cut four 6-inch pieces, and one longer one for the center. The length of your center piece depends on how long you want the skein to be. You also need to account for the width of your T-connectors in the length of your center bar (and technically you also need to account for the width of the pipe as well, but let's not get too crazy with the math). In this case, 18" from top to bottom yielded a 2-yard skein, which is too long for my swift. I went back and with some estimation and basic trigonometry came up with new numbers and cut a second one to 12.5" ... but this came out to 60" for the skein. So much for estimation. Five feet is a perfectly reasonable skein, but also a pain in the rear for calculating final yardage (wraps * 5 / 3). So I increased that to 14" and viola! it was a perfect 1.5 yard skein.

I think I'll put on some TV (can we say DVR of "Heroes" and "Battlestar Gallactica"? Yay!) and wind myself a skein tonight. This baby wants to be washed!

Tuesday, February 10, 2009

Pretty in Purple


Pretty in Purple
Originally uploaded by Project Pictures
And now, for a monster spinning update.

I've been wrestling with a mild repetitive-stress injury (self-diagnosed) that left me with aching arms and difficulty gripping my knitting needles. There was this sense that as I knit, I was making things worse, but it didn't actually hurt. At least, not yet. So being body-aware, I decided to leave things off for a while and try something else that wouldn't aggravate my arms, or at least not bother them in the same way.

A day later my arms really started to ache along the tendons, so I counted it a good deal, and on the advice of a friendly P.T. began to douse myself to the elbow in ice-water and a warm bath on a 3-minutes-cold / 3-minutes-hot cycle for up to 15 minutes at a time. It's amazing what properly applied cold and heat can do!

In order to distract myself from my waiting knitting projects, I pulled out my lovely purple fiber that I got as a Christmas gift, and my new Bosworth 22-gram Midi spindle, and got to working. This fiber is a Corriedale / Romney / Alpaca blend, and before you ask "Why that blend" let me remind you ... it was a GIFT. It's also fabulously dyed ranging from powder blue and lavender to deep royal blue and rich purple.

My first thought for it was a lace-weight shawl, but after petting it for a while, and consulting more experienced spinners, we all arrived upon the conclusion that this stuff is a bit too hardy for a lace wrap. Corriedale and Romney are both long-wool breeds (more or less), and long wools are better suited for hard-wearing outer garments. Sock yarn, my spinning friend suggested. Spin the heck out of the plies and then three-ply them with lots of twist. So that's what I attempted to do!

40 grams
Here, we can see one third of the roving. It's actually slightly more. The bag was labeled 4.4 ounces, so I spun up what I thought would measure 1/3 of that, but ended up being 40 grams. Close enough. I went on to spin the remaining 2/3 in 37-gram sections. The first cop and second, I wound off onto toilet paper rolls with my ball-winder. The third I left on the spindle. This was because I knew my spinning started a fair amount thinner and thickened as I got more fiber on the spindle. By working from the 'tail' end of one cop, and the 'front' end of the other two, I was able to even out the thickness a bit over the entire length.

Makeshift Kate
Here we can see my "bobbins" on a makeshift kate (a "lazy kate" is intended to hold multiple bobbins of yarn to allow you to spin the singles on them them back together as plies). I wound these three bobbins together onto a ball to use for plying. This is a great suggestion made by Abby Franquemont of Abby's Yarns, a very knowledgeable hand-spinner. The benefit of this technique is that it leaves you with an extremely portable storage "container" for your yarn, rather than having to tote around your kate wherever you are going.

100g wound on ball
At this point in time I have plied about 80 grams (of 120g total). My spindle is starting to get VERY heavy and the excitement of having a soon-finished yarn is wearing off under the realization of how much further I still have to go.

I'm still pretty excited about it all. I should finish with over 300 yards of fingering-weight yarn in lovely colors, ready for whenever I finish enough projects that I can actually get around to knitting it up!

Thursday, February 5, 2009

It lives!!!!

In a fit of insanity inspiration, I figured out how to calculate (or rather how to NOT calculate) my sleeve cap. Inspiration struck as I shrugged into an old shirt and noticed that (once again) the oil spots had not washed out of the front, and the hem was unraveling (hahahaha--some of you will get that) and in general it wasn't in very good shape. What better to sacrifice to the sweater gods?

I hopped downstairs and pulled on the body of the sweater-so-far and grabbed a Sharpie out of the pen-jar. Wonderful things, Sharpies. At this point my daughter started to pipe in with the obvious questions, "What are you doing with the scissors, Mommy? Why do you have the pen? Why are you drawing on your shirt?!!" (At which point I took a moment to explain that you should never, EVER, ever do this to your own shirts, and it is only for Mommies to do and .. hmm.. this probably should have waited until nap-time, but too late now! -- If I ever find a size 4T shirt sacrificed to the "sweater gods" I'll only have myself to blame.) I traced what I could of the armhole of the sweater right onto the shirt.

Replacing said beat-up-old-drawn-on-shirt with something slightly less beat up (hey, I was having one of those days where only the oldest, softest and most beat up comfy shirts would do) I flopped the poor thing down on the floor and applied the scissors to the shirt (remember, sweetie, you never EVER ever cut up your own clothes and shouldn't touch the scissors without Mommy around..). I snipped up the inner seam and laid the whole thing out flat. There! I had my correct arm-cap shaping. I then measured the thing, and figured out how to knit it. Viola!

It even worked. I finished knitting it this morning and carefully seamed it onto the body from the top of the shoulder down to the armpit. I didn't bother with the long seam under the arm, because this was purely a "I really hope this worked!" moment. It may not be the most amazing design ever, but it did work! I'm not sure if I don't want to take it off and clean up the lines a little bit. I know for certain, now, that I will be popping open the side seam and either adding a cable-strip all the way down to the hip, or at least a gusset under the arm because it is way too small around the arm.

But at least I know it worked! We're on to the second arm to see how much yarn will be left at the end, and if I need to risk picking up one extra skein at the LYS to finish things off.

Wednesday, February 4, 2009

Derailed on the Learning Curve

I like to understand how things work. I also learn better by doing than by reading (although I enjoy both!). These two little things combine so that (sometimes) when I get to the middle of a project, I have to stop. I frown. I prod. I get out a pen and calculator and scratch my head. I head to the internet, and the library and get my hands on everything I can to figure out how to fix the itty bitty problem that stalled me and somewhere along in this process I have to start to watch my mouth so that little ears don't pick up some new words, because I've come to realized that having half the information can get you into some really "interesting" situations.

Take my Celtic Cardigan. This sweater started out as one thing (the Cardigan for Arwen) got chucked out, kept the cable, pulled Carolyn from Knitty.com for its body and took off running, realized that the fancy cable for the back just wasn't going to work, so found Continuous Cables for its special motif, started the second lap, borrowed a little more from Continuous Cables for the cuffs and then got to the arm cap.... and stopped dead.

Now mind you, I've only done two sweaters before this, and a shrug. The shrug had NO shaping.. it was a big cross that you seamed up on two edges and bam.. it was a shrug instead of ... a funky big cross of lace you couldn't really use for anything. I did a cardigan for my niece which was striped and had slightly inset sleeves, and a pullover for my nephew (oh, dear.. I'm the Knitting Auntie) with drop shoulders. For some reason, then, Carolyn seemed like a good idea to me, with raglan shaping. Don't ask me why, because all of a sudden I realize I had no idea what "raglan" really was.

I don't have raglan shaping now, that's for sure. I have REALLY DEEP inset sleeves. But there are 7 stitches there at the shoulder that seam up. So.. since the sleeves don't go all the way to the neckline, it really isn't a raglan (or so I've found out). This makes an interesting problem when you start considering that the sleeve cap I have is written for a raglan pattern. It's also written with errors, for which I must bless TPTB, because without those errors I would have blithely knit the sleeve cap as-written and then been knocking my brains out trying to figure out how to fit it into an armhole that is much too small!

Except now I'm going to have to sit down with a ruler, paper, pen, my math brain and a very long article on Knitty.com of how to calculate a sleeve cap, and figure out how to design a cap to fit an armhole I've already knit...

Guess I took that curve a little too fast.