Wednesday, April 28, 2010

Wool in the Raw - Part 3


CVM samples
Originally uploaded by Project Pictures
While this is not the last in my series of dealing with raw wool (I still have several samples to go) it does for the most part finish up my attempt to clean, comb and spin the sample of CVM.

We start out with two itsy bittsy mini-skeins. On the right is the sleek 3-ply I spun from the leftover fluff of pulling out all the locks from the mass of fleece. I tossed that tangled poof into soapy water and let it soak and then very, very carefully loaded it onto the very edge of my hand carders and, in a way, "combed" that fiber. Since I only used the last few rows of tines it stayed pretty aligned, rather than getting jumbled up. Then I spun it from the tips. I was able to spin a very thin and smooth single.

The skein on the right is the leftovers from combing. This has lots of jumbled bits, nepps and short fibers. It is in some ways "trash". I took anything left on the combs after my four passes and tossed it in a bag. I then carded all those bits by hand and spun that batt woolen. I then wound a center-pull ball and made 2-ply yarn from that. It is much less even and a whole lot more fluffy. In fact, its quite a yummy, squishy little mini-skein.

Combed CVM single
The bird's nests of fiber that I dizzed off the combs I spun into a lace-weight single. I have skeined them here, but I haven't washed or set the twist, yet. That's largely because I cannot decide if I want to ply it back on itself, or if I want to ply it with something else, or if I just want to leave it as it is now. Any of these options are just fine. There are about 180 yards of singles, which is about 90 yards of 2-ply. Not a whole lot if I ply it on itself. But 180 yards plied with something else would be lovely. It is also a very nice lace yarn, but I think the CVM will really show it's lofty nature when allowed to open up with plying.

I'll let you all know when I figure out it out!

Monday, April 19, 2010

Wool in the Raw - Part 2

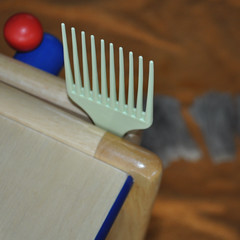
I'm a DIY gal. My niddy noddy is made out of PVC. I even set out to make myself a set of wool combs using nails and some scrap wood. But our hack-saw is so dull that I gave up in the end. Instead, as I walked down the aisle of the grocery store past the tiny section of hair-care items, I saw a blast from the 80s.. a hair-pick. I watched my friends tease their hair to astronomical heights with these things. But this time I looked and saw some really low-end wool combs.

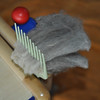
I couldn't quite figure out how to hold onto them, when it occurred to me that the "workbench" we got for the kids a couple of years back had the perfect clamp to hang onto the handle of a plastic pick.

Now if you want a really great tutorial on how to comb wool, I'm going to suggest you go watch this four part series on YouTube which is where I picked up my basics. I'm not going to go into too much detail about what exactly you're doing when combing wool, mostly because I don't understand it that well myself, yet. I might try explaining it more later on. I feel like I need to try it a few times, first!

In general, combing wool is intended to align the fibers and open them up for spinning. It's supposed to keep the tip ends together, facing the same direction. Unlike carding, it does not jumble the wool into a tangle but keeps everything laying parallel. This creates a "preparation" of wool that is ideal for spinning into worsted yarn. It's also supposed to be a lot more gentle on the fiber and is well-suited for very fine wools that would turn into a tangled, neppy mess if you carded them enthusiastically.

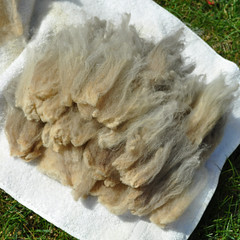
So to start, I took a few locks and sprayed them down with a water and oil mixture in an old hairspray bottle. This lubricates the fibers so they'll slide easily, and so they won't go all crazy with static while you're working.

CVM combing experiment
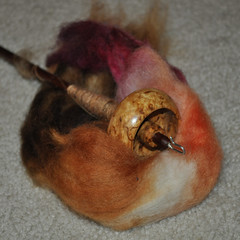
The next step is to load up the comb by "lashing on", which means to stick the butt end of the lock onto the tines of the comb. You then sweep a second comb across the tips of the lock so they catch and transfer to your other comb. I turned my comb at this point because you want to sweep them at right angles.
CVM combing experiment
Coming down from above was much easier for me with the second comb. Once all the fibers have transferred from your first comb to the second, you want to get them back to the first one again. So I moved it back upright and swept my full comb down at the stationary one to move them back over. Switch and repeat. You want to do this an even number of times so your locks end up on the original comb with the tip ends pointing out.

CVM combing experiment CVM combing experiment
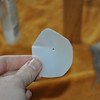
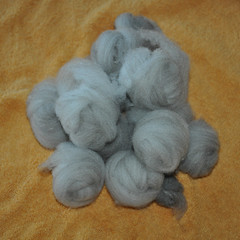
After that, I pulled a little twist of the tips of fiber through a small object called a "diz". Basically this is something somewhat hard with a little hole in it used to pull the wool off the comb while keeping it all aligned. Mine is cut from the side of a milk jug (which was inspired by a friends "favorite" diz made of the same material, or I probably wouldn't have thought of it). Easy. Fast. DIY. My kind of tool. Pulling the wool through the diz creates a long strip, or "sliver" which is stored in a little bundle of fibers until you want to spin it. These cute little poofs are "birds nests". Lots of new terms!

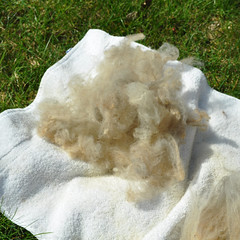
My DIY setup worked! Maybe not the best it could. As I worked I found out my washing process needs refining, too. The locks still had a goodly amount of lanolin in them. I got better as I worked through the ounce, making the transfer more easily and breaking fewer fibers. Breakage is bad. It gives you nepps (little knots of wool that broke and "sproinged!" into twisty tangles). My waste went into another bag which I later carded, nepps and all.

CVM combing experiment
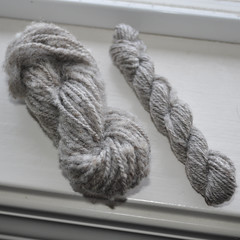
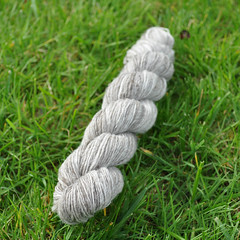
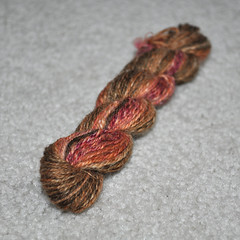
My bird's nests made a cute little pile. Out of two ounces of fiber, I ended up with just over one ounce of combed wool. That's a 50% loss and a little high. You loose some of the weight to washing, but I'm pretty sure my own "skill" was the worst culprit. Some of it was lost when I couldn't get it to separate into good locks. And some was lost in the combing. Still, I'm pretty happy with this as a learning process and the next step will be spinning the fiber.

Saturday, April 17, 2010

Wool in the Raw - Part 1

Welcome to my first installment of a many-part series. How many? I have no idea! What I do know is that I have five two-ounce samples of different fine wools as a Christmas gift from my mother-in-law, and another pound of Merino-cross wool that is simply too delightful for words.

What this means is that I need to learn how to process wool.

We start, in this case, with a rather unassuming package. It's about the size of a loaded Fourth-of-July bratwurst in a bun. This little plastic bag is packed quite densely with a sample of California Varigated Mutant fleece, otherwise known as CVM. Long story short on CVM is that it is really, wonderfully soft, and... it's not white. But it's worth reading up on the history of the breed.

CVM combing experiment
On one of the first sunny days I took the sample outside and settled into a chair out in the warm, bright rays and started to explore. Once out of the package, the compact bundle of fleece begins to expand. It poofs up a little just on extraction, but as I turned it over to try and unfold it out flat, it ballooned all over. You can see the original bag tucked under the ever-expanding mass.

CVM combing experiment
Once spread out, I pulled it back into my lap on top of a white towel and began to carefully tug the locks out and line them up. This involves finding an obvious end, grabbing it firmly, and then putting your hand on the fleece so you can pull and extract the single lock without unduly disturbing everything else. I pulled from the butt end, because the tips were not clearly defined. Because this is unwashed (but relatively clean) there was still plenty of lanolin in it, and the smell permeated everything. It also got my hands all warm and waxy. When I was done they were quite soft.

CVM combing experiment
When complete, I had a huge pile of neat locks, and a tiny little jumble of fibers that refused to be defined as anything other than a pile of mess. I figured I'd wash the poof up to play, and figure out exactly how to deal with the locks, next.

Since the sun was fading and the kids wanted to play, I packed up my locks carefully in the towel and put the whole thing away for the next time I could devote an hour or so figuring out what to do.

Darn it!


Darn it!
Originally uploaded by Project Pictures
So the other day, before it started to be too warm to wear wool socks, I pulled out my favorite pair. I put them on and as I usually do I set about cleaning off any pills and generally getting them settled on my feet just right. That's when I noticed that there was a spot on my heel that just didn't look quite right.

I took the sock back off and on closer inspection, I found a section that had almost worn through! While not happy to find a worn spot, I was still pretty pleased to have caught it before it became an actual hole. It is much easier to repair when there is at least a thread of yarn in place.

I want to point out there is a very nice tutorial over on HSJ Studio. I've read it several times and attempted to use it to fix bigger holes. Luckily in this case it was just a matter of following what was already there in duplicate stitch and voila! I have a fixed sock.

You can hardly spot out the patch, although it does show up in the different striping of color across the area right in the middle of my heel. I don't mind. I know these socks will wear for a whole lot longer, now that I've darned them.

Wednesday, April 7, 2010

Spindler's Challenge - "Going the Distance"

Yes, it's a new month and that means a new Spindlers' challenge. This month the theme is "Going the Distance". Quite a few people (myself included) couldn't help but think of the Cake song by the same name. In fact, it's one in my regular iPod rotation. But it just didn't really suggest anything in particular for yarn to me.

Really, my first thought in going the distance was not for a particular kind of yarn or color, but the idea that completing an entire, challenging project is going the full distance. And the start of any project like that is not just picking up what you want to spin and making it, but sampling your wool, first.

Yes, it's the dreaded "S" word, the "swatch" of the spinning world. The thing most beginners could happily do without. Because of the small amounts of fiber that are common put-ups, it's very hard to sample. Take out a few grams of fiber, and suddenly you might not have enough of that one-of-a-kind dyelot to make anything. But sampling is still worth it and a very good practice if you need to know if what you have will actually make what you want.

We just got our next Into the Whirled SAL fiber (did I post the old one? Oh yes, here it is!). The colors make me want to do colorwork socks, so I really need to get sock yarn out of the fiber. That meant I really needed to sample some to see how thin to spin the single.

But, I only bought four ounces. How do you sample for four ounces when you need almost that much for a pair of socks? You grab the same fiber dyed by the same lady, but in a different color! Luckily I have a grab-bag of scraps from her and I plucked out one that I was certain was the same as the SAL wool and fell to it.

In a sort of concurrent inspiration, a friend suggested that the song "I can go the distance" from the Disney movie "Hercules" could provide inspiration. It's really cute, with a nice theme and the young man singing has a lovely, clear voice. The bronze, brown and gold really called out to me and happily one of my scraplets matched!


Spindler's Challenge - "Going the Distance"
I dissected my favorite sock yarn and taped one single from it down to a notecard for reference and then spun to match its thickness. I then Navajo-plied my sample, washed it and whacked it firmly and hung the mini-skein to dry.

It's perfect! But.. it's not the right fiber. After the fact I found out that the sample fiber is probably BFL, and I'll be spinning Falkland for the SAL. Oh, well. It was a good first lap!