Friday, March 27, 2009

Knitting with Handspun


Handspun iPod Cosy
Originally uploaded by Project Pictures
It's not every day you get to knit with handspun. So far it has been even more rare for me to knit with my very own spun yarn. I have a test-square knit out of the very first yarn I ever spun, using hand-carded rolags of unknown wool and spun on a heavy Ashford student spindle in the grease. It's not lovely, but it is my first and I really like having it. I have a couple little balls left over of this yarn and I have no idea what to do with them. I think they'll just float around in my stash indefinitely, as examples of where I started.

Hannah Hat
I also have a hat I knit out of a merino/bamboo blend purchased at Dyelots. I love this hat. The yarn is absolutely beautiful. It is an ultra-bulky single with very low twist. The colors and bamboo blend from one to the next in a soft heathery rainbow. To spin this, I basically just split the roving until I had the thickness that I wanted and then added twist. I didn't really even draft it very much, and what I did was pre-drafting what I had already split out of each length of roving. This is a very valid way of getting yarn! But it was very much a beginner's effort.

But unlike these first projects, my "Lady Violet" sock yarn from Drunkard's Dyelot roving is the first time I sat down and said, "I want to spin THIS way" and then did it. In between making the super-bulky and this first skein of 3-ply sock yarn, I worked my way through nearly eight ounces of plain brown wool, practicing drafting worsted and then woolen (not that I knew the difference at the time), and working towards thinner and thinner singles. I did it all on a 23 gram Bosworth spindle (instead of the big Ashford) starting with park-and-draft and graduating to suspended spinning. I spun bulky two-ply, DK-chain-ply, and fingering two-ply. I test-spun a small amount of my Drunkard's Dyelot roving and was able to get a fingering weight 3-ply (chain) and decided I was ready.

400 yards fingering
And boy was I! I spun that roving into 400 yards of 3-ply fingering weight yarn. Since then I have often pulled out the skein and squished it, petted it, sniffed it, and pondered--what do I make out of this lovely yarn? It's overspun and tightly plied to the point of being slightly "crunchy" to the touch, and not even a gentle bath in hair conditioner fixed that. It is also Romney and Corriedale, so it's never going to be Merino soft (nor would you want it to be). It should be great socks, although part of me winces at the thought of cutting my skein in half!

I had a golf-ball sized nugget of extra yarn. After winding my plies, I had two bobbins with singles remaining. I doubled one on itself and used that with the third to make this last bit of three-ply yarn. Still thinking about what to do with the big skein, I set about making myself a mini project. I'm so glad I did! The yarn knits up very nicely, but it's great to see the difference that handspun makes.

Handspun iPod Cosy - closeup
It's not perfect. I have some fuzzier spots. In places it's just a bit thinner or just a bit thicker. It doesn't make absolutely precise lines and rows like a mill-spun yarn can do. I love the effect, but it does mean I need to look at sock patterns that can stand up to these variations and not look sloppy. I don't think I want to go with an elaborate twisted-stitch pattern that you might see in a sock by Yarnissima or Cookie A. I want something that shows off the yarn more than the pattern.

I still don't know what that will be, but I hope I can think of something lovely and perfect. And if I don't, I'm still going to end up with an awesome pair of socks.

Monday, March 23, 2009

When you can't leave well enough alone...


Leyburn Socks
Originally uploaded by Project Pictures
The Blue Moon Fiber Arts group on Ravelry (called "Socks that Rawk", after BMFA's "Socks That Rock" yarn) has started organizing a quarterly Knit-A-Long. The idea is to take one of Ravelry's less-well-known patterns (so, no Monkeys, no Jaywalkers, nothing with 1000+ projects already done). In fact, we're trying to pick patterns that have less than 100 completed projects and give them a big old KAL boost.

Leyburns were on the high end of this (I think they already had around 400-450 projects) but that's still pretty low and they won the popular vote. Now Leyburns have 624 projects, and over 200 people signed up.

It's an interesting pattern and I've done one other sock by this designer before (both Leyburn socks and Anastasia socks can be found at 
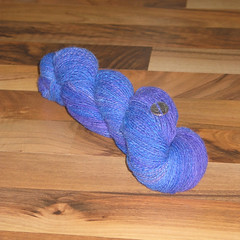
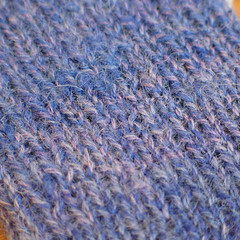
pepperknit.com). I like that they are toe-up patterns, but don't like the provisional-cast-on toe (Judy Becker's "Magic Cast On" from Knitty is just as easy and much faster in my opinion). The stretched-float pattern is also fascinating and does a lot to break up the pooling that can happen with a hand-painted yarn. The Yarn Harlot did a stunning pair that was a lot of fun to read about. But I just couldn't leave the pattern alone. I tried to knit it as-written, but the toe was only the first thing to go.

Leyburn - Riverbed architecture gusset
After getting up to my heel, I tried working a short-row heel, but didn't like it. I tried reinforcing the short-row heel. No-go. I tried to figure out how to turn the heel with a flap and just couldn't get there in the same space as a short-row heel.. so I frogged both socks back half-way and started a gusset using Cat Bordhi's "Riverbed" architecture. This keeps all the increases down on the bottom of the foot and gives you plenty of space to keep your stitch pattern going. It also hugs your arches really nicely. But because I had knit so far on both socks already, and because my pattern had something going on every-other-row, I didn't want to deal with increases every third row as is called for by Cat. So I did them every-other row. It makes for a funny bump when the sock is laying flat, but on my foot they fit wonderfully! It also gave me plenty of stitches for a very nice reinforced heel.

After that, I looked at what everyone had already done, counted my stitches and figured I either needed to add three, or loose two stitches to make counts work out, and the pattern is purported to not have a whole lot of give in it. Because I really like socks that cling to my leg, I decided at the very least I wanted a little bit of ribbing right at the heel to keep it pulled in tight. After that, I decided to just keep the ribbing going the whole way. This gives you an interesting little problem.

Leyburn - Reinforced heel
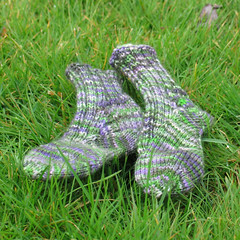
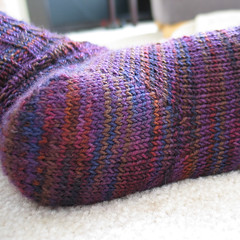
The float is created when you knit one stitch, and then slip five with the yarn in front. This happens every four rows. So on the instep, you knit six rows, but on the sole you knit eight. Since things are knit in the round, this difference is evened out a bit more than it might be otherwise, but there is still obviously more fabric on the bottom of my foot than the top (this seems to make it fit even BETTER). Now that I opted to not continue the pattern all the way around the leg, suddenly the back of my leg was longer than the front! But, the ribbing is also much "stretchier" than the stretched-float pattern across the front. This distributes more of the strain to the back and effectively shortens that stretch of knitting.

Leyburn - Picot cuff
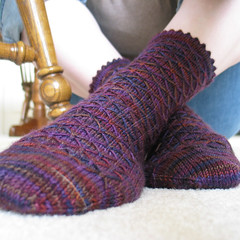
These socks look bizarre when laid out flat on the floor. But once on my foot they look lovely! To finish them off I opted for a picot edge created by knitting a stretch of stockinette with one row of yo-k2tog in the middle. Fold this in half and graft and you have a lovely, sturdy picot edge that grows invisibly from the rest of the sock.

Sunday, March 15, 2009

March Spindler's Challenge - Burgundy Rose

March Spindler's Challenge - Romance
March's challenge for the Spindlers' group on Ravelry had a theme of "Romance". Once again I found myself drawn to roses for the theme. Whether or not women actually love to get roses and flowers as a gift, the perception is that they are romantic. It doesn't hurt that in my Big Bag of Random Bits of Roving, I had the perfect colors again.
Burgundy Rose
A search on Flickr yielded a picture that nailed exactly what I wanted for colors, and a little careful prodding wrapped my roving into a flower all its own.

I spent a lot of time debating how to spin this roving. I have been wanting color-repeats to match up. The very best way to do that is to chain ply (also known as Navajo plying). Some debate that this method is not as strong as a "true" three-ply yarn. Either way, I don't really enjoy chain plying. But it does mean you can keep your colors all together, rather than having them "barber-pole" and blend. I chain-plied a small amount of the roving and realized in addition to all this, the color repeats come out much shorter when chain-plying as well, since you condense the yarn by two-thirds. In the end, I opted for three-ply yarn to see how well I could keep each color section together that way. My logic was that if I really wanted the colors to stay together without blending at all, I ought to be dying the finished product and not the roving. Handspun yarn ought to blend. Or at least, that's how I feel about it right now!

I split the roving into thirds, and then each third in half again for spinning. This let me get a full two repeats of the colors in each third.

Burgundy Rose
Originally uploaded by Project Pictures
When I wound the three plies together, I only had one that came out enough longer that I had to break out about five yards to bring the colors back into alignment again.

My yarn is 100 yards of fingering weight with three plies. My singles are not so heavy on twist as some earlier efforts, and I purposefully over-plied by just a little bit. This is supposed to make the yarn slightly more springy. It certainly is very squishy and soft! The colors even stayed together pretty well.

Wednesday, March 11, 2009

Mini Arches


Mini Arches
Originally uploaded by Project Pictures
I started these little socks quite a while back, using the pattern for "Arch-Shaped Socks" by Jen Showalter. I wanted to do a test pair that wouldn't take very long, so I decreased the number of stitches cast on to something that would fit my son and then redesigned the rest on the fly. It worked pretty well on the first sock.

When I came back a little later, I tried to remember all the different things I had done on the first. I had some notes, but they were a bit sketchy. Still, it's not like it was very difficult and so I jumped right in again, re-improvising in places. In the end, the two socks are extremely similar. But when I began knitting them, I didn't bother splitting the 2x2 rib when going from one DPN to the next. I just k2 and then p2 all the way around. When I got to the heel I then shifted all the needles one stitch over, so that the ribbing would be centered down the top of the foot. Only.. I didn't shift it the same way both times.

This is fine. They're socks for a child and that child (whoever it may be) is hardly going to care that a knit ridge goes down the top of one foot, and a purl trough goes down the top of the other. If they even notice. I notice, but mostly because it makes for a much nicer join at the heel, and a cleaner gusset one when I put the purls down the center. So that's good to know when I knit these for myself.

I love a non-painful learning experience.

Monday, March 9, 2009

Finally, for me!


Celtic Cardigan
Originally uploaded by Project Pictures
The title sounds like I never knit for myself. That patently is not true! In fact 80-90% of what I knit is for my own personal use. But when I took the leap from hats and socks to sweaters, my first two were earmarked as gifts for little people (my niece, and nephew). This had the advantage of letting me learn about sweater knitting, without committing to the price tag associated with enough yarn for an adult-sized sweater. I love both of these sweaters, but they left me feeling confident enough to jump into yarn I had earmarked for myself--10 skeins of Classic Elite's Inca Alpaca Print in a variegated blue colorway. This amount of yarn totaled 1090 yards, and I had originally planned on making a pullover sweater with it. Then I learned more about alpaca.

I originally purchased alpaca without knowing much about it. I knew it felt silky-soft in the store and I loved the heathery appearance. It made a beautiful shrug. What I didn't understand is some of the various properties of alpaca. Normally it has very little crimp to the fiber, which means unlike most sheeps' wool, it doesn't have a lot of memory of its shape, and the cloth knit with it likes to drape. Over time it likes to stretch out under its own weight. It is also hollow at its core and incredibly warm. The first two properties can be offset somewhat by blending it with wool (I stranded my project with a laceweight merino). The hollow core means a pullover would be great--if I lived in Alaska. In the Pacific Northwest, not so awesome. I elected for the cardigan instead and embarked on a long process of modifying and innovating. But I've mentioned all that before!

Celtic Cardgian - Back detail
All of the individual elements worked out in the end, and I'm really happy with the product, even if it didn't come out exactly as I had planned. As you can see here the back looks awesome! I'm extremely please with how this motif worked out. I was able to create a diamond around it where the knitting switches from stockinette to reverse stockinette. This is necessary to show off the cabling, and has the added bonus of looking really nice.

Celtic Cardigan - basted seams
The design wasn't perfect. I ended up with two yards of yarn to spare at the end. After basting the sides with waste-yarn, they arms were way too tight. I raveled my swatch and used it to create gussets at the armpit. You can hardly see them on the finished product, but they give the sweater just enough ease to be really comfortable. I couldn't help but snap off a picture of that amusing process. Just ignore the drips on the mirror. Finishing my sweater was much more important!


Celtic Cardigan - neck graft
I am also inordinately proud of a little-noticed detail, the graft at the back of the neck. I was able to graft the cables together seamlessly with the help of a wonderful tip I got off of Ravelry. To quote that user: When done the main knitting (don’t break your yarn) - knit about four or five extra rows with a light colour dishcloth cotton. Knit or purl the stitches as they present themselves. Cast off. Bring the two sides together with your kitchen cotton folded in like a seam. When grafting you can follow the light coloured dishcloth cotton in and out of your stitches. When you are done you just undo the bind off and rip back the kitchen cotton. You end up with perfect grafting in knit/purl and you don’t have to think about which direction you are going in and out of stitches. Don’t have to worry about stitches falling off your needles or juggling all the needles. It makes it as easy as straight seaming.

There are parts of this sweater that make me think, "I could have done this a little differently." But when I look at the whole, it is a lovely, fashionable sweater. It is dreamily warm and looks fabulous with blue-jeans or dressier pants. I am extremely proud wearing it and love showing it off. And I appreciate every last bit of advice and help I received in creating it. I couldn't have done it without all my friends.