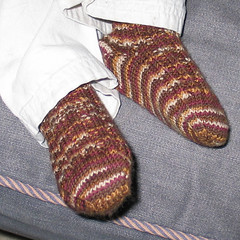
Vacation knitting is a ton of fun. This past week I decided to get one pair of my children's socks done. So I brought along the leftover brown yarn (Shibui Sock in Earth, leftover from the Icosa Ball) I had earmarked for my son, and some size 2 needles.
The beauty of simple socks is you don't really even need a pattern once you have the hang of them. The wonderful thing about children's socks is that they're so small they take almost no time at all to complete. I kept a pair of DS's store-bought socks on the side to give me a feel for a good size, and just improvised.
These socks start with 16 stitches in Judy's Magic Cast-On. I increased on either side of the instep and sole (using Cat Bordhi's LLI and RLI) every-other row until I had 48 stitches. Then I worked the instep in a 2x2 rib, and the sole in stockinette. I did extend one purl stitch on either side of the sole to make the numbers work out right and center the ribbing. The foot is 20 rows long to the heel.
The heel is short rows, starting with all of the sole stitches and decreasing to eight stitches (between wraps) before increasing back to the full width. I didn't bother to pull up the wraps and knit them. After all, these are going on a 1.5-year-old boy; he doesn't care about the wraps! The cuff is 2x2 ribbing all the way around, and is 24 rows long. Bind-off was in pattern: *work one, pass previous stitch over* repeat to end.
I'm moderately happy with the socks. I think I could probably reduce them to 32 stitches and be much happier. At first glance they seem to fit just fine. But there is little (if any) negative ease, and unless stuffed into shoes they slide right off his little feet. In fact, he seems to like that and pulls them off at the first opportunity with much laughing.
I think after I get a bunch of other projects done, I may try these again with leftover green (Shibui Sock, again) yarn. It was a lot of fun, tho, to whip out a pair of socks without even having to think about it, and do it so very fast.
Wednesday, October 29, 2008
Tuesday, October 28, 2008
The Fourth Time is the Charm?
A couple of weeks ago I had the idea that I wanted to use the herringbone stitch in a hat. I really love the way it shows off hand-dyed yarn. It was wanting to make this hat that drove me to run out to Dyelots and get roving to spin my own bulky singles just for this hat! After that, I decided that I needed to engineer the stitch to be done in the round.
I got out some old yarn and started working on a swatch just to see how the stitch went together. I used the pattern from My So Called Scarf and went to it. A couple of rows and I figured out a trick to working the stitch in the round. I also worked out an 'easier' way to do the first row.
Start with an even number of stitches
Row 1: K1, *s1, k1, yo, psso both knit and yo* - repeat until there is one stitch left, K1
The second row gets interesting.
Row 2: *yo, k1, slip both stitches back to the left needle, pull third stitch over yo and knit stitch, slip two stitches to right needle* repeat around
It creates a beautiful pattern... that has absolutely no give along its length. Having worked from the top down, I had the crown of my hat done and started working this pattern, only to find I couldn't stand how stiff the cloth came out. Hat #1 hit the frog pond.
I immediately went to Ravelry and browsed patterns for bulky and superbulky hats and found Urchin, from Knitty (isn't it pretty?). Here was something just made for this yarn, right? I cast on and worked my way through two sections of the pattern. Texturally it was a good fit, but boy did it not look nice with my yarn. The handspun merino/bamboo blend has lovely silvery streaks running through it because the bamboo does not take the acid dye and remains white. Garter stitch reduces that to a muddy sheen. It's pretty, but it's not drop-dead gorgeous the way that stockinette is with this particular yarn.
Back to Ravelry again! For a long time I have had Hannah from MagKnits in my saved patterns. It's for bulky yarn, and a super-cute hat. I decided to give it a try.
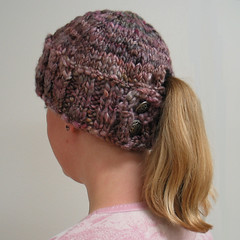
Our first problem here is that Hannah calls for bulky yarn and my handspun ... well, to say it nicely it transcends "bulky". My second skein is much closer in weight to a milled bulky yarn, but I'm saving that for some mitts. I sat down with the pattern, my handy Molskeine notebook, and math on the brain. Then I went for it. Even as I knit, I decided that parts of it were still going to be too big. I made the buttonholes smaller (only one YO instead of two), and dropped out rows left and right. The beauty of very-bulky projects is they knit up SO FAST!! Two hours later and I had a "finished" hat again. I tried it on and it was incredibly cute! Plus my yarn had made a rather interesting color-spiral at the crown.
Unfortunately it was just a shade too big. Oh, it looked nice. It looked like it fit. But if I bent over, this pretty "little" hat would tumble right off my head. I tried snugging up the button-band. I shoved it in my suitcase for the trip home and considered for several hours if a little bit of elastic woven in would do the trick.
Instead, when I got home, I carefully picked out the woven-in-end at the crown and pulled the whole hat apart once more.
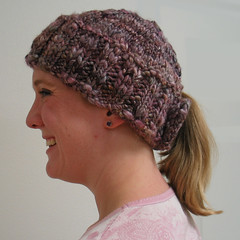
Yesterday I cast on ten stitches less, figured out how to make the first row of decreases bring me back in line with my pattern for the crown, and whipped this baby out one last time. It worked! The hat fits beautifully. It looks lovely, with a wonderful match between yarn and pattern (and my clothes). And it is amazingly soft and warm.
And I made it, yarn and all!
Tuesday, October 14, 2008
A Momentary Dye-gression
For quite a while I have admired the "My So-Called Scarf" pattern on Ravelry, especially when knit with particular Malabrigo colorways. The herringbone stitch pattern looks lovely and warm, sturdy without being too heavy or overpowering.
After making Versatility with Manos del Uruguay, I decided I wanted to do a hat with the same herringbone stitch in a lush, chunky single. After listening to the Y Knit podcast on spinning, I gave in to the desire to make the yarn myself!
I had the good fortune (and wonderful, understanding DH to enable me) to take a class in hand-spinning with a drop-spindle at one of our two great LYSs. Over the course of four weeks, we started with raw fleece and ended up with yarn. We fluffed locks, carded rolags, spun, plyed and finally washed out all the nasty yuck and came up with .. well. It was yarn. I knit a 1x1 square out of it and stuffed it in my cabinet. But it did give a very firm grounding in the art and craft of spinning yarn with a drop-spindle. I just wasn't in love with the fleece-processing.
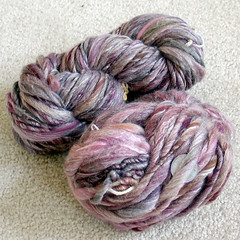
It took me these last few years to realize that I could skip that part. You can drop spin from all that delicious, gorgeous roving that is in so many places around here. A local dyer provided me with 8 oz of lovely roving made of merino wool blended with bamboo fiber. Because it is acid-dyed, the merino wool took up the color beautifully, but the bamboo (being cellulose and not protein fiber) remains untouched and silvery white. She also gave me a quick overview of how to deal with the roving for spinning. Easy!
I took it home with the promise to myself of doing the spinning .. sometime later. That didn't last. I had to play with it, and then I had to spin the whole thing!
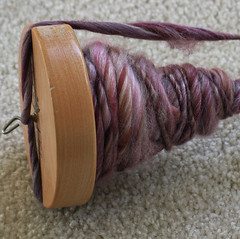
I was going for a bulky single, so I spun what felt thick. Now that I look at it.. it isn't just bulky, it is "holy-cow-that's-some-thick-yarn" extra chunky. It's still gorgeous and soft. There are about 40 yards in that effort.
The second half went even better as I worked more consciously on drafting an appropriate amount of fiber. I ended up with 75 yards of something much closer to bulky-weight. Both halves are luscious. I'll probably use the thicker weight in the brim of the hat and do the crown in the (slightly) thinner yarn.
I do need to finish a couple of things first, but I've already re-engineered the herringbone stitch to work in the round. The idea is continuing to percolate while I finish up my Violeta mitts and Gumdrop socks. I can't wait to get started!
Subscribe to:
Comments (Atom)

