Wednesday, December 14, 2011

Little Weaver

Little Weaver by Project Pictures
Little Weaver, a photo by Project Pictures on Flickr.
I'm not the only one that did well at this year's Weaver's Guild sale. Here's my very own little weaver, showing off her wares. She put her nose to the grind-stone and created five sets of four mug-rugs on a tiny hand loom (using my own handspun yarn). They were lovely.. and they all sold!

She's extremely proud of herself and I am thrilled, too!

Little Weaver

Tuesday, December 13, 2011

Finished Towels

Finished Towels by Project Pictures
Finished Towels, a photo by Project Pictures on Flickr.
Here they are, all done!

I was able to weave five towels with five different twill patterns. They all came out quite nicely.

I zig-zag stitched the top and bottom of each and then hand-stitched the hems.

And then I put them in our local Weaver's Guild sale... and they all sold!

So now I need to weave more towels.

Monday, November 14, 2011

Twill Thrills

I've been itching to weave twills. I tried to figure out how to do them on a Rigid Heddle loom (it's not impossible, but I didn't really feel like working quite that hard at it). I bought the four-shaft loom this summer, meaning twills were within my reach. I even checked out Twill Thrills from our local Weaver's Guild and then subsequently found a reasonably priced used copy on Amazon and snatched that right up.

So after all that, I thought you all might like to see. I'm taking these...

8/2 cotton by Project Pictures 8/2 cotton

And making these...

Twill progress Twill towel 2

Towel #3 Twill Towel #4

Twill Towel #5

I am using the 4-shaft LeClerc Medico table loom with a point-twill tie up and drafts of my own devising using the PixeLoom program.

It's pretty fun!

Excuse me. I have to get back to work!

Friday, November 11, 2011

An incredible gift

Baby Sweater by Project Pictures
Baby Sweater, a photo by Project Pictures on Flickr.
I want to share with you all something that I find incredibly moving. I've had a hard time sitting down and putting it to writing, because I can't seem to convey how honored and amazed I am to be a part of this story.

Last month, I finished a baby sweater.

It came to me from a friend.

This sweater was started by her aunt. Her aunt had knit seventy-two sweaters in her lifetime. Fifty-five of those sweaters were knit for foster children in her care. This sweater was #73.

It came to me nearly complete. The back, sides and arms had all been knit to the yoke. In fact, they had already been joined on a long, circular needle, with two rows knit. It wasn't much work to read through the pattern, understand what had already been done, and complete this woman's life's work. I tightened up a couple of rows where the gauge had slipped quite a bit, and carefully seamed up the completed sweater. There were even buttons included in the bag of tools, yarn and notions that was given into my keeping.

I'm told the aunt passed away this year. She left behind four completed sweaters, this unfinished sweater, and five grandchildren.

The five sweaters will be passed on to her grandchildren, part of the story of an amazing knitter's life.

I'm so incredibly moved to be a part of this legacy to her family.

Thursday, November 10, 2011

October Overview

I wish I had a bunch of great pictures to show you for my work in October. But I haven't taken any!

You will just have to believe me that this luscious Merino/yak/silk is almost finished yarn:

Christmas 2010 by Project Pictures

And this gorgeous green Malabrigo is very nearly a completed pair of socks (which I have knit almost twice over with everything I needed to figure out) and in fact will be a completed pattern some time very soon!

Malabrigo Sock - Lettuce

And you'll have to take my word for it that while I didn't weave a thing in October, I did enough thinking for two months worth of weaving to happen very soon, now.

Happily, I know you all believe me. Don't you?

Thursday, October 13, 2011

I'm a little behind...

Log Cabin Too by Project Pictures
Log Cabin Too, a photo by Project Pictures on Flickr.
But I'm working on it! Here's a scarf I wove last month (in the back) and the one I finished this week (in the center). But why are they the same?

Because I have two looms! The previous scarf I wove on my rigid heddle loom, because it was familiar. The second was woven on my new (to me) table loom.

I had planned for the two to be identical so that I could focus on the difference between the two looms. Of course, I slipped up a little in my planning. To explain the subtle mistake I made I first need to digress into a long-winded explanation of the differences between a Rigid Heddle loom and a table/floor loom.


Schacht 20" Flip Rigid Heddle Loom
So here's our first illustration. This is my Schacht Flip Rigid Heddle loom. The thing that causes the most confusion for me to explain clearly is the bit white bar you see in the middle of the loom (not the white strands of yarn! Sadly, this is not the best picture to explain, but it is the best one I currently have). All the yarn passes through this thing, half through long slots and half through tiny holes in the middle of the white plastic bars. It is, on this loom, the "rigid heddle". If you lift it and set it on the blocks of the loom, it raises half the strands of yarn, letting you weave one "pick". If you press it down and slide it under those blocks, it lowers half the threads (effectively "raising" the other half) which lets you weave the next "pick". The slots and holes are spaced evenly such that if you have a 10-dent heddle, you will have 10 ends of yarn in each inch with 5 in slots and 5 in holes. An 8-dent or 12-dent heddle would have 8 ends or 12 ends per inch, respectively.

LeClerc Loom
Here we have a table loom. Again, this isn't going to be the best picture to illustrate. In front you can see the beater which contains a reed (the thin slots). This is an 8-dent reed (which will sound familiar). It means if you put one end in every slot, you'll have eight ends per inch. But that doesn't raise or lower your warp ends. Instead there are four "shafts" that you can't currently see behind the beater. You can see them attached to the levers at the top of the loom. Each of those levers raises a shaft. On each shaft are dozens of moveable metal "heddles". These are bits of wire (or they can be made from string, but mine are wire) that stretch from the top of the shaft to the bottom and in the center of each is a little loop/hole where you put the warp ends. Properly threaded each shaft will raise a number of warp ends to weave just like the rigid heddle. For instance, if I wanted to do plain weave (which would be lifting/lowering the rigid heddle on the Flip) I would thread every-other-end into a heddle of either the first or second shaft so that when one is lifted, half the ends are lifted, and when the second is lifted it brings up the other half.

At this point I have no clue if I'm making any sense at all! But here's the thing. Since the shafts, beater, and heddles from the table loom are essentially all combined into one object on the rigid heddle loom, they do one major thing differently. When you go to "beat" your current weaving into place on the rigid heddle the "shed" (the space where you pass your yarn through) is closed automatically. That means the warp likes to close around that yarn and hold it in place so it doesn't pop back out. Now, on the table loom you suddenly have to make a decision. Once I put a shaft up, it stays there until I let it back down again. So I can beat with my current shed open. Or I can close the shed and beat. Or I can open the OPPOSITE shed and beat that way. Each way makes the yarn act a little differently as you beat it into the weaving.

That's one thing I'm working on figuring out.

But what tripped me up is that I forgot that my reed on the table loom is an 8-dent reed. And the rigid heddle I used on the Flip loom was 10-dent.

This wouldn't have been a problem if I had remembered the original plan. Because the heddles on the table loom are movable, you can thread the reed any number of different ways to change your ends per inch. For instance, if I thread one end in every dent on an 8-dent reed, I have 8 ends per inch. But I could thread two in every dent and have 16 ends per inch, or three in each and have 24 ends per inch. Or I could get tricky and thread it 1-1-1-2 and get 10 ends per inch. Which is what I was going to do.

But I forgot!

It's not a tragedy. I have two interesting scarves. I prefer the 10-ends-per-inch version. But I have an 8-ends-per-inch version as well and it is fascinating to feel the difference. It has much more drape. If you lay both across your cupped palm, the 10-dent version stretches over it like a tent, but the 8-dent version falls into the cup of your hand. The 10-dent version is much more "squishy" and what I expect out of a scarf, but they're both very nice.

And I hope I haven't bored you all after all this rambling!

Wednesday, October 12, 2011

September Stashdown

Completed for September (and a little of October):

8 ounces handspun knit up:
Bitterroot shawl

8 ounces millspun woven:
Log Cabin Too

8 ounces of fiber spun (the blue is completed, just with no finished picture):
Anzula Merino Cross Textiles A Mano cashmere-blend batts

Tuesday, October 11, 2011

Bitterroot

I got on a real finishing kick this week. I polished off the scarf that was lingering on the loom, washed/whacked/dried a skein of yarn, finished knitting a baby sweater for a friend and also finished the shawl I was working on last month!

I really love this shawl. It began in 2009 with two very different fibers. The first was a lovely, dusty rose and brown Merino, and the other was gorgeous pink and plum tussah. I wanted to combine the two, but didn't want long stretches of dusty brown in the mix, so I did a lot of prep on the Merino fiber. I broke the top at the color changes and sorted the pink from the brown. Then I stripped each section down and mixed them up so that there was one bit of brown with two or three bits of pink and pre-drafted them together to blend. I spun all of the top up and plied it over the three weeks of the 2009 Tour de Fleece. It came out to 950 yards of spindle-spun yarn! (Plus another 100 yards of leftover silk single which I just plied on itself this year.)

Here's the wool in its original form, and in the predrafted bundles I created:

Superwash Merino Tour de Fleece - July 9th

And the tussah as I spun it up:

Tussah Top Tour de Fleece - July 7th

Because I was documenting for the Tour de Fleece, I have a lot of fun pictures of this project as it went along. They can be found in my 2009 Tour de Fleece Flickr set. Below are the finished singles of both fibers, wound off the spindle on to TP rolls for storage, and those same singles re-wound into a plying ball (half was already plied in this picture).

Tour de Fleece - July 10th Tour de Fleece - July 13th

And last, but not least, the shawl itself. The pattern is "Bitterroot" (Ravelry link). I used all but five grams of the yarn, and almost 600 beads! It's huge and just exactly what I wanted it to be!

Bitterroot shawl Bitterroot shawl

Thursday, September 1, 2011

Building a cop

Jaberwocky
I often see the question come up "how do you build a good cop on a spindle". There are many, many different ways and many reasons. I'm going to go over my process here, with pictures to demonstrate.

More often than not I use two distinct shapes of a cop. The first is a "cone" shape. This is the shape I started using from my very first class in spinning. It seemed logical. Start winding on with each strand aligned with the next, up and down the spindle. It ends up getting fatter at the end next to the whorl because on that end the strands won't fall off each other. It tapers towards the other end because that is the only way to keep the whole thing stable. The yarn pictured to the right is the second yarn I ever spun, made from roving that I pre-drafted to width and then simply added twist and wound onto the spindle.

Bosworth Midi 23g
And here is the first bit of yarn I spun with actual drafting going on. See how we still have the parallel-wound cone going on?

The benefit of winding in a parallel manner is that since all the strands run the same direction, they snug down against each other to create a very dense cop without much air in it. The downside is that you are limited by the width of your whorl. Once your cop reaches that width it becomes increasingly difficult, if not impossible, to keep winding on. The yarn will no longer stay in the handy notch carved into the whorl and this can cause all sorts of "fun" problems with yarn flying about. Another weakness is that it is possible to develop loose loops at the bottom of the cop that want to spiral undone down the shaft.

ITW - Just Figs SAL
One solution to this problem is to use a spindle with a long shaft and to build a really long cop with a very limited taper. This still only allows you to pack on fiber to the width of the whorl, but gives you a lot more area in which to put all that yarn you are spinning. This doesn't completely solve the problem of the bottom of the cop getting loose as you work, but since the bottom of the cop isn't at such a steep angle, those loose loops are less likely to form.

My preferred solution to these problems is cross-winding. You cross wind by spiraling your single (or plied yarn) up and down the shaft of the spindle. Because the strands now criss-cross each other, they are able to hold down lower layers. But because they do cross over lower strands, this creates a gap where there is air in the cop. This isn't a bad thing, but it does mean that the cop builds up bulk faster than if the strands were laying side-by-side. It also means the center of the cop tends to get larger faster than the ends, creating what I think of as a "pregnant cop" or a "football cop".

Tussah Silk - WIP
Here is a little "football cop" just getting started. You can see how it tapers at both ends. If you keep the bulk of this cop from coming abut the bottom of the whorl (necessary in this case because of the carved-out shape of the underside of the whorl) you always have a narrow point to wrap your yarn before bringing it up to the hook. This gives you the leverage and friction you need to keep the yarn in the notch and you won't have the problem of your yarn leaping off the hook while you're spinning. When the cop can actually press up against the underside of the whorl, the shape changes a little and becomes more cone-like. You can keep the belly growing by cross-winding (or even straight-winding) more yarn lower down so that the entire shape shifts down the spindle towards the end of the shaft.

Bellwether Wool Company
This image demonstrates how the shape of the cop changes when up against the whorl. The end that would usually taper is doubled back to make that part bulk up more. You can end up having a conical shaped cop again if you don't move the bulk of the winding down the shaft at this point.

I like using the best of both worlds for my cops. Personally, I like the look and feel of a tightly-wound conical cop. I usually start that way. If, at any point, I start seeing looseness in my cop or loops trying to work their way off the bottom, I simply cross-wind for a little while to "tie everything down". When I feel that I've stabilized my work, I return to straight-winding again. In this way you build a cop that is both stable and dense, maximizing how much yarn you can get on the spindle.

If, as you work, you find that you have more fiber than you think will fit using a cone you can always start cross-winding more and also concentrate your straight-winding around the center of the cop. This will build up a nice little belly that over time can get quite big.

Full Spindle
Just how much can you get on a spindle? A lot more than you think. This cop is over six ounces of fiber. That was on a Kundert spindle that weighs just a little more than an ounce, and while it wasn't fun towards the end I still could have packed even more fiber on this.

According to Abby Franquemont, Andean spinners can get a full pound of plied yarn on their bottom-whorl spindles. Personally, that's a whole lot more than I want to do!

I really think that pictures do even more than words to show what I'm doing, so here is a series of one of my recent projects. The fiber spun is dyed kid mohair. You can see by the end that the "belly" on my cop is bigger than the whorl of the spindle, allowing me to put all my fiber on one spindle without running out of space.

Day 3 - Spindle-spinning mohair by Project Pictures Day 4 - Kid Mohair
Day 8 - Mohair Day 9 - Blue mohair
Day 13 - Mohair Day 19 - blue mohair
Day 20 - More blue mohair

Wednesday, August 31, 2011

August Recap

Giant Clam
I spent two of four weeks out of town in August. I didn't have my loom, and I didn't want to drag knitting with me. And...
It.

Was.

Hot.

But I spun up two batches of fiber. The first is two batts of "Giant Clam" in a naturally-dyed crazy mixture of fiber that was wonderful to spin.

Rainbow Farms Pygora by Project Pictures
The second is this fabulously amazing Debouillet/Pygora (and Debouillet/Pygora/Silk) mix from Rainbow Farms Pygoras. OH. MY. GOSH. This stuff is crack. On crack. With some crack on the side. And a little whipped cream on top. If you see these batts at Black Sheep Gathering or any other fiber festival, BUY SOME. That is all.

I did knit a project this month. Sadly, it is another one of those Secret Projects. I'm really excited to share it with you all, but it will have to wait!

Monday, August 29, 2011

Them's knittin' words!

While reading back through one of my usual blogs, I saw that the author had linked to this inane article. And while reading through the comments I happened upon a particular response. What is wonderful about the internet (sometimes) is how it opens up the opportunity to chase an idea down and learn more about it.

I was so moved by the poem, I had to hunt it down. In my search I found a number of interesting obituaries, biographies and tidbits of trivia and I finally found this page which reprints a letter from Elizabeth Cady Stanton to Eliza Wright Osborne to admonish her for persisting in the unworthy endeavor of knitting and also the poem I enjoyed so much, which is Eliza's response.

And while you might enjoy chasing those links down as much as I did, I will also reprint the poem here so that you don't have to!

Dear Mrs. Stanton, in your skit
Against your sisterhood who knit,
Or useful make their fingers,
I wonder if,--deny it not,
The habit of Lucretia Mott
Within your memory lingers!


In retrospective vision bright,
Can you recall dear Martha Wright
Without her work or knitting?
The needles flying in her hands
On washing rags or baby's bands
Or other work as fitting?


I cannot think they thought the less,
Or ceased the company to bless
With conversation's riches,
Because they thus improved their time,
And never decreed it was a crime
To fill the hours' niches....


I could say more upon this head.
But must, before I go to bed,
Your idle precepts mocking,
Get out my needle and my yarn
And, caring not a single darn,
Just finish up this stocking


Eliza Wright Osborne

Tuesday, August 23, 2011

Toto, I've a feeling we're not in Kansas anymore ...

Don't call me. We're not at home!

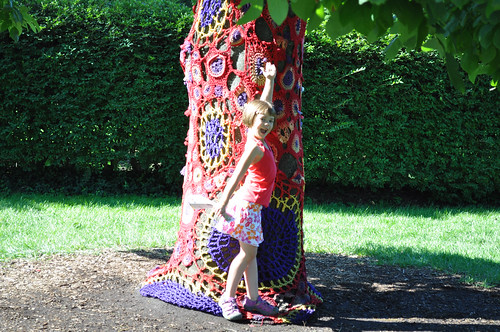
This tree is at the Morton Arboretum in Lisle, Illinois. Isn't it amazing? The Arboretum is hosting a lovely show of "Nature Unframed". There are quite a few really amazing works to see, but I particularly loved this one, along with at least a dozen other yarn bombs of "lichen" all over the park.

The kids had a great time here, too, playing in the hedge maze and all through the children's area of the Arboretum.

In the spirit of the yarn-bombing, I'm just going to photo-bomb this post!