Thursday, October 13, 2011

I'm a little behind...

Log Cabin Too by Project Pictures
Log Cabin Too, a photo by Project Pictures on Flickr.
But I'm working on it! Here's a scarf I wove last month (in the back) and the one I finished this week (in the center). But why are they the same?

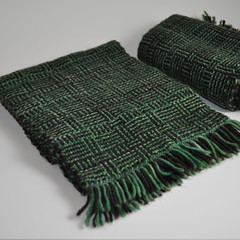
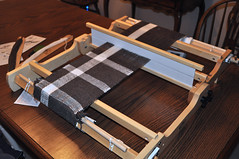
Because I have two looms! The previous scarf I wove on my rigid heddle loom, because it was familiar. The second was woven on my new (to me) table loom.

I had planned for the two to be identical so that I could focus on the difference between the two looms. Of course, I slipped up a little in my planning. To explain the subtle mistake I made I first need to digress into a long-winded explanation of the differences between a Rigid Heddle loom and a table/floor loom.


Schacht 20" Flip Rigid Heddle Loom
So here's our first illustration. This is my Schacht Flip Rigid Heddle loom. The thing that causes the most confusion for me to explain clearly is the bit white bar you see in the middle of the loom (not the white strands of yarn! Sadly, this is not the best picture to explain, but it is the best one I currently have). All the yarn passes through this thing, half through long slots and half through tiny holes in the middle of the white plastic bars. It is, on this loom, the "rigid heddle". If you lift it and set it on the blocks of the loom, it raises half the strands of yarn, letting you weave one "pick". If you press it down and slide it under those blocks, it lowers half the threads (effectively "raising" the other half) which lets you weave the next "pick". The slots and holes are spaced evenly such that if you have a 10-dent heddle, you will have 10 ends of yarn in each inch with 5 in slots and 5 in holes. An 8-dent or 12-dent heddle would have 8 ends or 12 ends per inch, respectively.

LeClerc Loom
Here we have a table loom. Again, this isn't going to be the best picture to illustrate. In front you can see the beater which contains a reed (the thin slots). This is an 8-dent reed (which will sound familiar). It means if you put one end in every slot, you'll have eight ends per inch. But that doesn't raise or lower your warp ends. Instead there are four "shafts" that you can't currently see behind the beater. You can see them attached to the levers at the top of the loom. Each of those levers raises a shaft. On each shaft are dozens of moveable metal "heddles". These are bits of wire (or they can be made from string, but mine are wire) that stretch from the top of the shaft to the bottom and in the center of each is a little loop/hole where you put the warp ends. Properly threaded each shaft will raise a number of warp ends to weave just like the rigid heddle. For instance, if I wanted to do plain weave (which would be lifting/lowering the rigid heddle on the Flip) I would thread every-other-end into a heddle of either the first or second shaft so that when one is lifted, half the ends are lifted, and when the second is lifted it brings up the other half.

At this point I have no clue if I'm making any sense at all! But here's the thing. Since the shafts, beater, and heddles from the table loom are essentially all combined into one object on the rigid heddle loom, they do one major thing differently. When you go to "beat" your current weaving into place on the rigid heddle the "shed" (the space where you pass your yarn through) is closed automatically. That means the warp likes to close around that yarn and hold it in place so it doesn't pop back out. Now, on the table loom you suddenly have to make a decision. Once I put a shaft up, it stays there until I let it back down again. So I can beat with my current shed open. Or I can close the shed and beat. Or I can open the OPPOSITE shed and beat that way. Each way makes the yarn act a little differently as you beat it into the weaving.

That's one thing I'm working on figuring out.

But what tripped me up is that I forgot that my reed on the table loom is an 8-dent reed. And the rigid heddle I used on the Flip loom was 10-dent.

This wouldn't have been a problem if I had remembered the original plan. Because the heddles on the table loom are movable, you can thread the reed any number of different ways to change your ends per inch. For instance, if I thread one end in every dent on an 8-dent reed, I have 8 ends per inch. But I could thread two in every dent and have 16 ends per inch, or three in each and have 24 ends per inch. Or I could get tricky and thread it 1-1-1-2 and get 10 ends per inch. Which is what I was going to do.

But I forgot!

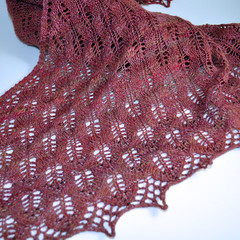
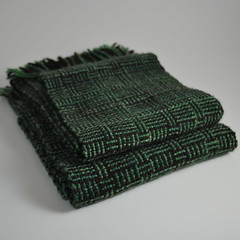
It's not a tragedy. I have two interesting scarves. I prefer the 10-ends-per-inch version. But I have an 8-ends-per-inch version as well and it is fascinating to feel the difference. It has much more drape. If you lay both across your cupped palm, the 10-dent version stretches over it like a tent, but the 8-dent version falls into the cup of your hand. The 10-dent version is much more "squishy" and what I expect out of a scarf, but they're both very nice.

And I hope I haven't bored you all after all this rambling!

Wednesday, October 12, 2011

September Stashdown

Completed for September (and a little of October):

8 ounces handspun knit up:
Bitterroot shawl

8 ounces millspun woven:
Log Cabin Too

8 ounces of fiber spun (the blue is completed, just with no finished picture):
Anzula Merino Cross Textiles A Mano cashmere-blend batts

Tuesday, October 11, 2011

Bitterroot

I got on a real finishing kick this week. I polished off the scarf that was lingering on the loom, washed/whacked/dried a skein of yarn, finished knitting a baby sweater for a friend and also finished the shawl I was working on last month!

I really love this shawl. It began in 2009 with two very different fibers. The first was a lovely, dusty rose and brown Merino, and the other was gorgeous pink and plum tussah. I wanted to combine the two, but didn't want long stretches of dusty brown in the mix, so I did a lot of prep on the Merino fiber. I broke the top at the color changes and sorted the pink from the brown. Then I stripped each section down and mixed them up so that there was one bit of brown with two or three bits of pink and pre-drafted them together to blend. I spun all of the top up and plied it over the three weeks of the 2009 Tour de Fleece. It came out to 950 yards of spindle-spun yarn! (Plus another 100 yards of leftover silk single which I just plied on itself this year.)

Here's the wool in its original form, and in the predrafted bundles I created:

Superwash Merino Tour de Fleece - July 9th

And the tussah as I spun it up:

Tussah Top Tour de Fleece - July 7th

Because I was documenting for the Tour de Fleece, I have a lot of fun pictures of this project as it went along. They can be found in my 2009 Tour de Fleece Flickr set. Below are the finished singles of both fibers, wound off the spindle on to TP rolls for storage, and those same singles re-wound into a plying ball (half was already plied in this picture).

Tour de Fleece - July 10th Tour de Fleece - July 13th

And last, but not least, the shawl itself. The pattern is "Bitterroot" (Ravelry link). I used all but five grams of the yarn, and almost 600 beads! It's huge and just exactly what I wanted it to be!

Bitterroot shawl Bitterroot shawl