Wednesday, March 31, 2010

Quick Overdye Experiment

I have left-over yarn. It is from a project that is one of my very few "UGH!!"s as far as knitting goes. I probably shouldn't have knit it in the first place, but I got sucked into the excitement of a Knit-a-long. I bravely altered the colors the designer had chosen and came out with a decent bag.. that I'll never use. And I'm left with yarn in colors that simply don't speak to me at all.

I like electric blue well enough. But its eye-burning nature in quantity is not particularly appealing. I've been considering knitting the Dumpling Bags from Interweave Knit's Fall 2008 issue (amusingly enough by the same designer as my failing KAL experience). But I'd hate to throw yarn I don't like at a project that could be cute.

It occurred to me that there is no reason at all my yarn has to stay colors that I hate. I have dyes. I have containers. I have a microwave dedicated to dying.. I can overdye the yarn!

Quick Dye Experiment
To decide what direction I wanted to take, I grabbed up some of the scraps of eye-burning blue that were left over from the previous project. Lucky me.. there were exactly four scraps already. And I had four colors I wanted to try.

Seen here, there are pre-mixed solutions of Jacquard acid dyes in Emerald Green, Purple, Periwinkle and Turquoise/Navy mix. I added a plastic spoon's worth of vinegar and a plastic spoon's worth of dye mixture to each of four small containers and the soaking yarn. I popped them all in the microwave "until they got hot", let them sit a couple of minutes and then rinsed everything down the drain (except the yarn!).

Quick Dye Experiment
It wasn't an exact experiment. I just wanted to see if I liked the blue overdyed with any of these colors. If I want to get a precise depth of shade, I'll have to be more exacting. But right now, I rather like the look of the Periwinkle overdye (bottom left). It gives me a solid working idea for later.

Now I just need something that will fix the Tangerine yarn...

Sunday, March 28, 2010

Pixie Dust

Here I am, finally caught up to March in my Spindler's Challenges, and this month the theme was "Fairytales and Folkelore". I had in my possession this roving, pulled from three batts, which I created for a class on combining and blending colors in drum-carding. I'll go more into that in another post. But in short, this roving is made up of three batts with a base of gold, rose and aqua wool. To each was added dyed tussah silk, angelina, more wool to tone or tint, and some silk cocoon bits.

My daughter loves her fairies and the theme called to mind the glowing trail of dust Tinkerbell leaves behind as she flies. There is certainly plenty of sparkle, here!

Triad - Pixie Dust
Since the roving is an experiment, I also experimented with the spinning. I spun thicker using long-draw. I tried super-thin. And I settled on my current favorite for small amounts of fiber--a lightly spun single.

I love this compared to the single I spun last month straight from the batt. Since this is a pulled roving and I spun the batt from one end, this is still even more lofty. The colors mix and blend throughout the entire length, rather than blending from one to the next slowly. It will knit up in a significantly different fashion and I'm looking forward to seeing that, too!


Saturday, March 27, 2010

Truely Outrageous

February's Spindler's challenge theme was "The 80's called, they want their tacky back".

Tacky doesn't really describe my stash, or my style. But I did have a small length of dyed top in bright colors that instantly reminded me of my wardrobe in the 80's (intense pastel button-down shirts with the collars turned up.. yikes!). I also had left-over fuschia firestar and what jumped out in my head was a memory of a cartoon called "Jem!"

I rented my LYS drum-carder to further blend some batts I had purchased online. When I was done with those I went ahead and created this batt. I broke the braid into its parts and then fed each one into the carder individually so that they would cover the drum evenly, and blend in-between. I also added a very healthy portion of sparkle.

Spindler's Challenge - Jan 2010
After the "Vitality" single last month, I really wanted to see what a multi-color batt like this would do in a single, too. So I spun it much the same way as the white Punta, but what you get is a pretty different yarn. Even if I dye the Punta now, the fibers in any one section will all be one color. This yarn blends from shade to shade along its length. Where one color section moves on to the next, the colors swirl around each other. And even as a single it is much more "lofty" and thus softer to touch, having been spun from a carded batt. I really like both singles and it's great to get to compare them.

Friday, March 26, 2010

Vitality


260 yards "Punta"
Originally uploaded by Project Pictures
I'm a little behind in my Spindler's challenge posts, so I think I'll stick a few in here in quick succession.

January's theme was "Vitality". I'd been working through a bunch of samples that I had received in a swap (I sent away five+ ounces of cotton I knew I wasn't going to spin, and got back five one-ounce samples of a bunch of different wools). One of the samples was "Punta", which is named for a region in South America, rather than a breed of sheep. This makes it a little more difficult to categorize since you could get wool from many different breeds that happen to live in that area.

This wool was white, medium staple with a soft sheen, and a little crimp. It was soft, but not "Wow! That's soft!". I've been trying different techniques with the challenges and on this challenge I decided that Vitality, to me, spoke of the vital energy of an unbalanced single. I spun intending to get a lace-weight single with a short-draw to keep it very smooth. I was extremely pleased to be right on the mark with my spinning!

Saturday, March 20, 2010

The Perfect "Thank You"

To anyone out there that receives a hand-knit gift, I present to you the perfect "thank you".

Don't worry too much about being effusive (well, you CAN, if you really want to). But honestly, the best thank-you available is a picture of the item being used (as intended!!).

I'm so very, very happy!

Garterlac Dishcloth

I love having handmade cotton dishcloths in my kitchen. Unfortunately there is also someone in my house that leaves them in the bottom of the sink. What happens to them there does not leave a particularly pleasing scent. So after boiling the living heck out of them every week or so, and using them for every cleaning activity possible within the kitchen, eventually they wear out!

This means I get to knit more. My usual pattern is the very first knitting pattern I ever made. My grandma and mother taught me to knit using a bias-dishcloth pattern that is ridiculously easy. And it creates a particularly attractive little square. It's a two-fer! I've gone on from there and very much enjoyed making round dishcloths, and the Ball-Band Dishcloth (from Mason-Dixon Knitting). I've even gone so far as to machine knit a dishcloth (I never mentioned, but in the end the gauge wasn't quite tight enough on that to stand up to much use).

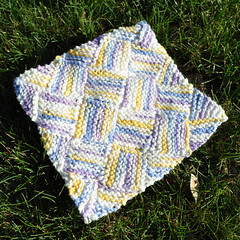
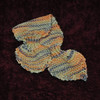
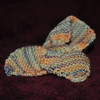
Lately, I have been playing with Criminy Jickets' Garterlac Dishcloth. This is a popular pattern on Ravelry (over 1,000 projects!) and it's quite a bit of fun, too. It's also a great way to introduce someone to entrelac.

Entrelac is a method of using short rows of knitting to produce a cloth that appears to be woven even though it is knit of one piece. Typically it is worked in stockinette, but the garter-stitch works here to make a better dishcloth.

I liked the opportunity to practice entrelac, and a technique that anyone doing lots of short rows should know... knitting backwards. Normally you knit from the left needle, creating loops onto your right needle, but it's not that much of a stretch to reverse the process and work loops from the right onto the left. This saves you the annoyance of turning your work over every eight stitches (or less). It is also really useful for colorwork in the flat, but that's a different post.

The one thing I didn't like about this dishcloth was that it required a cast-on edge. Because of the way the side and top triangles are knit, any sort of cast-on is going to look different from the other three sides. I started the pattern as-written and quickly ripped that back out. I also read the blog carefully and debated the "no cast on" option (which really is a "provisional cast on" option where you pull out your cast on and knit what would have been the cast-on triangles as if they were cast-off triangles). None of this really felt elegant to me.

My option is to treat the "cast on" edge as if it were an increasing triangle. You don't need any cast on at all. You do need one slip-knot in which to begin knitting (or a backwards loop or whatever floats your boat).

Cast On one stitch

Increasing Base Triangle
K 1, turn, K-FB, turn.
K 2, turn, K-FB, K 1, turn.
K 3, turn, K 1, K-FB, K 1, turn.
K 4, turn, K 2, K-FB, K 1, turn.
K 5, turn, K 3, K-FB, K 1, turn.
K 6, turn, K 4, K-FB, K 1, turn.
K 7, turn, K 5, K-FB, K 1, turn.
K 8, turn,
K 6, K-FB, K 1, return last stitch to your other needle and treat as first stitch of the next triangle

Repeat for two more triangles. On the last triangle, do not increase in the last row (end with 8 stitches). Begin regular instructions at "increasing side triangle".

Tuesday, March 16, 2010

Now back to our regularly scheduled knitting...


Rose Bag
Originally uploaded by Project Pictures
Back before the Ravelympics, I started a bag. This is the Christmas Rose Bag from Handknit Holidays. It's a very easy pattern with a lot of nice elements of design.

I used Cascade 220 yarn for this project. The first skein is a hand-dyed skein from MeanBean, my swap partner in a yarn swap that took place AGES ago. Right after getting this yarn I began to hunt around for a project that would fit and I found someone that had knit an extremely similar bag. I picked up a skein of black Cascade 220 to use along with this one, and then let the whole thing marinate in my stash for over a year. It wasn't until recently that I thought to look up the book at our local library.

Happily, our wonderful library had a copy! I reserved it and once it was in my hot little hands, I very much enjoyed reading through the entire book. There were several other patterns that spoke to me and I also knit the River Forest Gansey. I think that means I need to add a copy to my own library sometime soon.

Rose Bag
The bag is knit top-down. I used a cabled cast-on and knit my tail into the first row (one less end to weave in). I also knit in the tail of the contrasting color in its first row. I'm all for less work later on. The first few rows are a 2x2 "rib", but when it's stranded you loose the structure of ribbing. Instead you get these wonderfully nubbly purl stripes of the contrasting color coming through the black. They look wonderful.

The rest of the bag is simple stranded work. Because the black and red are such high contrast I opted to not capture any of the floats, even when they got particularly long. Because of this I will either need to toss the whole thing in the wash for some light fulling, or I need to line it eventually because those floats threaten to snag every time I take something in or out of the bag.

The I-cord ties really finish off the whole piece. They were surprisingly fast to knit (considering I had to do two 4-foot lengths). But the gentle variation of the red yarn really looks nice in I-cord.

Rose Bag
The bottom is decreased at five points. Conceptually I like this and it yields a good, flat bottom. It probably goes better with the smaller size of the bag, tho. In that version the floral motif is knit five times which would line up with the bottom decreases. The large has the pattern repeated six times, and if I knit this again I might try a six-sided decrease to see if it works as well.

All in all it's a fun, easy knit. I have baseball-sized leftovers of yarn which might end up as an iPod-sized stranded cozy.

Sunday, March 14, 2010

Ravelympic Knitting - Part 2


BSJ - With Buttons
Originally uploaded by Project Pictures
For some odd reason I always feel guilty not committing myself to a full size sweater or monstrously complicated shawl. Although to be honest, just completing a child's sweater is more than enough challenge for me!

Still, just to make absolutely sure I'm challenged, I sign up for two (or three) projects to get done. My second project this year (not counting the doll scarf) was this Baby Surprise Jacket.

I picked a little something to knit for a soon-to-be arriving baby in the family, and hunted quite thoroughly through my entire stash for some yarn that could go "either way" since the gender of the child in question is still.. in question.

One of my good friends (thank you!) lent me her copy of Elizabeth Zimmerman's "The Opinionated Knitter" (I must purchase myself a copy some time soon). And I was able to work this very simple pattern from its pages.

The Baby Surprise Jacket is a fun, fast knit! It's knit flat, and the entire project is worked in garter-stitch (so no purling!). Even beyond that, you need to know how to increase and decrease and that's about it! I managed to complete the entire thing (sans buttons) in two days of frantic knitting and got in just under the wire for the finish of the Olympics. I counted myself done without buttons because I wanted to pick something that would be more gender specific, but we didn't know the gender of the baby yet!

I cast on for this sweater with a crochet provisional cast on in a contrasting color of yarn. I almost left it in at the end because it looked quite nice, but instead opted to use Jenny's Surprisingly Stretch Bind Off to finish the cuffs AND to bind the shoulders together at the same time. I used the same cast-off on the fronts of the sweater so it gave the entire piece a nice, cohesive edging. Anyway, to finish things, I freed up my provisional stitches onto my circular needle, and then started binding off one cuff. As I got to the sleeve/shoulder, I picked up my slipped stitch from the edge of the other side and bound it together with each live stitch from my cast-on and this joined the seam neatly. At the neck I simply went back to binding off the live stitches (taking time to count and make sure I'd have the right amount of stitches left on the other side). The second cuff was a bit of a tight area to work, but long, flexible KnitPicks cables came to the rescue and I just pulled some of the stitches onto a "magic loop" while I worked the other side of the cuff.

After that the sweater sat around for a couple of days and I couldn't restrain myself any longer. I went button shopping.

Sadly the selection at our local store did not immediately yield up obvious possibilities. In fact, it forced me to rule out several ideas I had originally planned upon. I had wanted to get some little cars for a boy, or some ladybugs for a girl. Unfortunately, the bronze color of the yarn clashed with everything terribly. Even silver didn't work.

BSJ - With Buttons
Then I lucked upon these sunny buttons. They don't scream boy or girl, but at this point I'm just thrilled to have something that looks as lovely as these do! I'm extremely pleased and amazed at how this final touch makes the whole project come together.

Monday, March 8, 2010

Ravelympic Knitting - Part 1.5


Little Scarf
Originally uploaded by Project Pictures
I'd call this "Part 2" but the project was so small and fit in between everything so well, I almost hesitate to give it a whole section. A gym-buddy of mine is giving her daughter an American Girl doll this year and she approached me with the question of "How much would it be to have you knit a scarf for her?". She wouldn't take "nothing" for an answer (I knit for gifts, not for pay, because putting a price-tag on the time and effort it takes would make things ridiculously expensive). So we settled on her covering the cost of the yarn, and I'd pick out what I had on hand that was suitable. What I grabbed was a 1/6-sample of a skein I had from a sock-yarn swap. Perfect!

This little scarf took perhaps two hours to knit, but probably less. I knit while watching TV and didn't put much effort or concentration into knitting vs watching. It used under 40 yards of fingering weight yarn on Size 2 needles. I dug out the yarn and pattern while I allowed the part of my River Forest Gansey to block. The hardest part? Translating it!

The original is in French (PDF link). I own an adult version of this sort of scarf in the book 101 Designer One-Skein Wonders but while I could modify that one, it wouldn't give me guidelines for what would fit a doll. The French pattern was already written in doll size and when I debated the difficulty of recalculating gauge (not very hard) AND having to figure out what the "correct" size was for an American Girl doll versus the amusing challenge of translating a language I didn't speak--working with the French pattern won out.
Little ScarfLittle Scarf
MY TRANSLATION
Using fingering weight on size 4 needles:

Cast on two stitches
1st row: knit 1, make 1, knit 1
2nd row: knit 1, make 1, knit until the end of the row
Repeat row 2 until you have 18 stitches
Knit for 10 rows garter
Separate every other stitch onto two different needles. (9 sts on two needles)
Knit 1/1 rib on one needle for 10 rows, break yarn and knit 1/1 rib on other needle for 10 rows
Rejoin by knitting one stitch from each needle, alternating (18 sts)
Knit in garter stitch for 4 inches (20cm)
Halve stitches by k2tog, p2tog, repeat to end
Knit 10 rows 1/1 rib
Next row increase to 18 sts by k1, m1, last stitch kfb
Knit garter for 10 rows
k1, k2tog, knit to end of round
Repeat last row until only 2 stitches are left. Bind off.

Notes:
I used Size 2 and not Size 4 needles, and Socks that Rock Lightweight yarn (fingering). My "Make 1" was a lifted bar increase, from back to front and then knit into the front to twist. On the first row after joining in yarn, I knit with the live yarn and the tail for several stitches and then just cut the end. It saved weaving in later and doesn't show up at all.

Monday, March 1, 2010

Ravelympic Knitting - Part 1

Well, friends, I'd left of blogging for a little bit, there, because I was pretty well sidelined with the actual knitting. Rather than the writing about it.

But seeing as I have a moment free, here, I thought I would toss up the happy endings of a couple little Ravelympic stories.

The first is my River Forest Gansey.

I have been wanting to knit a sweater for my son for quite some time now and the Ravelympics always seem to be the perfect time to do a little sweater knitting. I'm not quite crazy enough to think I can manage an adult sweater (yet), but knitting for a child seems completely do-able. Last time I managed a cute cardigan for my niece and this time I thought I'd knit for myself, vicariously.

I picked this pattern out of Handknit Holidays. I may have to pick up a copy of the book for myself, because the one I used is a much "loved" copy from our local library. There are a couple of patterns in it I would really like to do, and I think I might knit another version of this sweater as well. It's written in both child and adult sizes.

The yarn is Debbie Bliss Rialto and I can't say enough good things about this yarn. It's a cable ply yarn with a crazy number of singles (which I didn't fully dissect to count, but there are a LOT). It is incredibly bouncy and has fantastic stitch definition. It is also superwash and thus perfect for knits for children. I already did a sweater for my nephew out of the same yarn, but in gray.

I also love it because I bought a whole bunch on a crazy sale ;)

River Forest Gansey
The sweater is an easy knit. The basic pattern repeat is only six stitches and four rows so it is simple to memorize. The trees at the top aren't that hard either, and the pattern was pretty easy to follow as written. I did not purposefully do any modifications. However, it is possible that I knit the sleeves in a smaller needle size by accident. Woops. I'm not re-knitting them, now!

The only reason I suspect this is that the body had a lot more "give" in it. I blocked both the body and the sleeves to the next size bigger. The body had plenty more stretch and probably could have gone even one size larger. But the sleeves were a bear to get blocked big enough to match the body. I still managed it and everything seamed up a treat.

I've managed to wrestle the boy into wearing the sweater a couple of times already, and it handles washing well. It still fits after a tumble dry, although the sleeves are a bit short. That's not all bad, considering how much of a mess he's prone to get into!

Some basic stats:
Pattern: River Forest Gansey by Jolene Treece
               from Handknit Holidays
Size: Small (25" chest)
Yarn: Debbie Bliss Rialto, approximately 4 1/4 balls (488 yards)
Needles: Size 5 and 7