I've been working my way through my stash and trying to finish off partial balls and bits and pieces. It feels to me like a "Spring Cleaning" in reverse. My "Winter Destash" has yielded a lot of lovely yarns. One of them was a pretty green thick-and-thin yarn by Farmhouse called Lumpy Bumpy (by Charlene).. I used this in a very pretty hat, stranded with Misti Alpaca Chunky, but had half of it left over with no idea how to use it.
It's a gorgeous yarn, and beautifully soft. The green is wonderfully saturated. I still wasn't sure what to do with it, but set out to knit it and see what happened. I thought maybe it would turn into a scarf for my daughter, but as I cast on I had the idea for fingerless mitts. I knit the yarn into a square and seamed the cast-on and cast-off edges together, leaving a gap for the thumb. With the last few yards I added a thumb. I had exactly the right amount of yarn with barely a yard left over!
Lumpy Bumpy Mitts
Hand
Cast on 25 stitches.
Knit 37 rows, slipping the first stitch every row.
Bind off.
Join cast on and cast off edges for about two inches. Leave a two-to-three inch opening for the thumb and join the rest of the seam.
Thumb (optional)
Pick up and knit twenty stitches around the opening, starting from, and ending at, the top (finger end) of the mitt. Turn work to knit back the other direction. You will be working these stitches back-and-forth around the thumb opening. The decreases will fall at the base (wrist side) of the thumb opening.
Knit 8 sts, k2tog, k2tog, knit 8. Turn work.
Knit 7 sts, k2tog, k2tog, knit 7. Turn work.
Knit 6 sts, k2tog, k2tog, knit 6. Turn work.
Knit 5 sts, k2tog, k2tog, k5. Turn.
Knit 4 sts, k2tog, k2tog, k4. Turn.
Knit 3 sts, k2tog, k2tog, k3. Turn.
Bind off stitches with kitchener stitch.
Weave in ends, and complete your second mitt.

Monday, November 24, 2008

Friday, November 21, 2008
Short Row Love
Some days, you think a project is done, and then when you come back later it just isn't perfect. Does that mean you shouldn't change it? It is, after all, "done".
In the case of my Violeta gloves, it was love, but not perfection. I had never made fingerless gloves before, but the more I wore them, the more the opening around the thumb irritated me. It stretched. It gaped. It felt incomplete.
I still had a small nugget of cashmere yarn left. I wasn't sure what to do with it, but I'm not one to throw away even the smallest amount of yarn if I think I can turn it into something new. I spent some time looking at the thumb-opening, and considering what to do with it. I tried picking up stitches and knitting myself a thumb straight off.. but it stuck out and was awkward. Then it occurred to me.. short rows were the answer!
I picked up stitches around the opening and worked short rows starting at the base of the thumb, including one more stitch each pass. This made a lovely afterthought thumb.
Violeta Afterthought Thumb
Pick up and knit 24 stitches around the thumb hole (or an even number of stitches to match your opening) such that the start of your round is the base of the thumb (wrist side)
Knit one round
Knit two stitches, turn work
Slip first stitch and purl 3, turn work
Slip first stitch and knit 4, turn work
Slip first stitch and purl 5, turn work
Slip first stitch and knit 6, turn work....
... continue in this pattern, working one stitch past the slipped stitch each row.
Work until two unslipped stitches remain at the "top" of the thumb.
Knit all stitches until you reach the start of the round.
Knit three more rounds
Purl one round
Bind off purlwise.
Friday, November 14, 2008
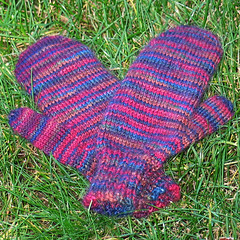
Progressive Mittens
Here are the "recipes" for my two sets of mittens. They were developed using "Progressive Gloves" and "Thumb Gussets" by Pam Allen (IK Winter 2003). They both have the "Wide Gusset", and some extra shaping at the fingertips.
Progressive Mittens
Materials:
Size 1 (2.25mm) needles
Mountain Colors Hand-Painted Yarns, "Bearfoot" merino/mohair blend (about 30g)
Size
1-2 years (3-4 years)
Stitch count is the same for both mittens. The larger pair is longer, not wider. This is because I found it much easier to get a one-year-old's hand and thumb into a bit looser mitten. The ribbing at the wrist still keeps it snug.
Cast on
Cast on 44 sts and join to work in the round
Optional: Purl one round, Knit one round
Cuff
Knit 15 (20) rounds in K2, P2 rib
Wide Gusset
Knit 2 (4) rounds in stockinette stitch
On the last round of st st, knit 20, pm, knit 4, pm, knit 20
Wide gusset increases two stitches every three rounds
* Increase round: Knit to marker, inc one stitch (lift bar between two stitches and knit into the back), knit to next marker, inc one stitch, knit to end
Knit 2 rounds
** Repeat from * for 14 (15) total rows (14 gusset stitches)
Next round: knit to marker, move stitches between markers to scrap yarn and cast on 4 stitches in the gap, knit to end.
Hand
Knit 14 (25) rows
Decrease pinky side (k2tog, knit to last 2 stitches in round, ssk)
Knit one round
Decrease pinky side
Knit one round
Decrease pinky and thumb (k2tog, knit 16 sts, ssk, k2tog, knit 16 sts, ssk)
Knit one round
Decrease pinky and thumb
Knit one round
Decrease pinky and thumb for three rounds
Bind off with Kitchener stitch
Note: I found the transition from decreases to Kitchener to be somewhat abrupt. To try and smooth this, I treated the first two and last two stitches as one, binding them off together.
Thumb
Put 14 gusset stitches back on working needles and pick-up and knit the 4 cast-on stitches. (18 sts)
Work in the round for 12 (16) rounds.
Decrease with *k2tog, k1* (12 sts)
Decrease *k2tog* (6 sts)
Break yarn and thread through remaining stitches twice. Pull tight.
Weave in all loose ends to finish.
Thursday, November 13, 2008
More Mittens
Sometimes you need a quick project. I needed a filler in between the Grey Gansey, and my next project (the yarn for it was on order at the time). Since my DD has grown out of her old mittens, I opted to make a new pair.
My first try started with Pagewood Farms Denali hand-dyed yarn in the "Grape Juice" colorway. This yarn called to me in the store with its many shades of purple. Strangely enough, it is one of the few yarns I like much better in the skein than knit up. It doesn't have a particularly nice feel to it, despite the fact that it is merino wool. The yarn doesn't have much bounce, as I've gotten accustomed to using with Socks That Rock. And I get very seriously tired of looking at purple, purple, purple while I'm knitting.
I also ran into a small, but amusing problem. I didn't take good notes when I wrote down the pattern for these mittens the first time. My gusset instructions left me thinking to increase two stitches every round for 14 rounds. This gives you a gusset that is half the size of the entire mitten! I frogged back and tried again, increasing every other round. That seemed almost right and I finished the entire mitten, going back for the thumb and scratched my head. There were still too many thumb stitches. I decreased early on and went with it. Finally, it dawned on me that this particular gusset requires you to increase two stitches every THIRD round. Blast.
Looking at that slightly kludged single mitten, I decided it just wouldn't do. Between the futzing with the pattern, and the color, I really didn't like it. Rather than subject myself to working more with the too-purple yarn, I dug into my bag of Bearfoot mill ends and pulled out two mini-skeins that I thought were the same colorway. Each was 27 grams... surely that would be enough for two mittens. With luck I might even get two mittens out of one of them!
I came very close! These two mittens took 30 grams of Mountain Colors Bearfoot yarn (merino/mohair blend) in the "Pheasant" colorway. Or I hope it's Pheasant. I have no idea with most of my mill ends!
In creating the mitten pattern, I used Interweave Knits' "Progressive Gloves" article. I was lucky enough to download this article back when it was available on the Knitting Daily website. It might still be there, somewhere, but I have the worst time finding things. I have the PDF for both it, and for the in-depth gussets article and they have been extremely useful. I designed my first pair of gloves using these articles, and two pair of mittens. "Progressive Gloves" was originally published in Interweave Knits, Winter 2003, and is very worth finding in your library to read. It gives you the underlying math to calculate your own gloves or mittens out of any gauge of yarn. Add any lace you like to the cuff and back of the hand, and you instantly have a gorgeous glove of your own design!
Sunday, November 9, 2008
Grey Gansey
I must say that I love knitting on Monday nights. It's great for my ego. A number of the women there seem very surprised with "how much I get done" in the week. At the same time, I'm just amazed at how many projects I see them come in with! I suppose I look at it from the perspective of knowing just how much knitting time I missed, rather than how much I managed to squeak in (which is usually quite a bit).
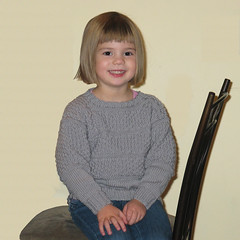
For instance, this afternoon I finished up another knit gift for my family. This one will move on to my nephew and hopefully be good for two years. I was aiming for a 2/3 size, but as you can see on my daughter, I think I hit closer to 3T (and maybe 3/4). At any rate the cuffs can be rolled up and a chunky look is going to be quite cute with this particular design.
Despite of the fact that I don't understand why you want to bother with minimal shaping on the sleeves, I did end up doing some. In the end I put six short rows in, each one short 8 stitches of the previous row. That makes the top of the sleeve just over one inch longer than the bottom. I'm not sure it makes a huge difference, but it made me feel smart and creative--so that's good enough! It also matches the sweatshirt I was using as my template.
I'm not certain this sweater is actually a gansey. I had a hard time understanding if it was the shape, or the cabling that made a gansey (or perhaps both). No cables here--just double-moss stitch. But is has a very attractive, blocky shape that seems to match all the ganseys I was able to find in my research. I still like the name better this way. It's much more elegant than "grey sweater".
I need to find a couple of "made with love" tags that I can put into things I am making for gifts now. This one needs one, and I need to mail one to my mother so she can (please, Mom?) tack it into the sweater I left there to be given at Christmas time. I'm also thinking of including a small bottle of Eucalan or Kookaburra wash. With as lovely and as special as these gifts are, I'd like to see them last a long time.
And even if they don't, I really had a lot of fun making them!
Wednesday, November 5, 2008
Toss the pattern, keep the design
I've decided to make knit gifts this year for some of my family. I already have two done and left behind with appropriate persons to had them over at the proper times. Here's one more in the works.
My sweet niece will be receiving a beautiful Debbie Bliss cardigan. I figured her older brother needed something just as handsome. I had plenty of Debbie Bliss Rialto in my stash from when our local Ben Franklin Crafts decided to close out that particular type of yarn. My nephew has great blonde hair and bright blue eyes, much like I did when I was younger. So I'm certain this soft grey is going to look smashing on him!
I picked out a DROPS design (s7-5 Sweater in Alaska) on Ravelry. The pattern is written for a heavier weight yarn than the Rialto, but it also only goes down to size 3/4. As my nephew is 2.5 years old, I figured I could work out the differences in gauge to give me a smaller size. I started off following the 3/4 size pattern, casting on in the round and working up to where the sweater split to create the armscyes. Around that point I decided that back-calculating lengths and gauges was much too much of a bother. I rummaged through our old clothes and pulled out a much-loved sweatshirt that had the same basic shape as my pattern.
The pattern got tossed back in the basket. Instead, every few rows I lay out what I've done against the sweater. It's working out quite well. The other night I did the front, binding of stitches to match the sweatshirt's neckline. Today I was able to work up the back and do the same. I sewed the shoulder seams with a standard mattress stitch, and then picked up and knit all around the neck. I did about one inch of a 2x2 rib on much smaller needles and I think it's come out pretty well. I was slightly tempted to pull it out and do it on one size smaller yet.
Then I decided to tempt my daughter into trying it on. She's a year older than her cousin.. so clearly I'm still a bit big. Then again the model in DROPS shows the shoulder seams extending half-way down his upper arms, so maybe not!
I've spent the rest of the day puzzling over the pattern instructions for the sleeves. I think I've got it all figured out but for one thing. For some reason there is shoulder cap shaping... but it's only two rows. In the pattern's gauge, that's all of 1/2 cm of shoulder shaping. I'm thinking about ignoring it altogether. My yarn stretches 1/2 cm if you look at it. What's the point of those two silly short rows?
If you know, feel free to enlighten me. It'll take a while to get that far up the arm, anyway!
Subscribe to:
Posts (Atom)